Mosstone "Custom Jag" - A Twelve Year Work In Progress

Show members what you're up to! Get tips, tricks and advice.
Post Reply
User avatar
Mossman
Reactions:
Posts: 1783
Joined: Wed May 27, 2020 1:46 pm

Introduction


This is a repost and an update of the very first project thread I ever posted on the old AGF. Back in 2008, I was brand new to Rondo Music and the Agile Guitar Forum (as it was called then). I already had an AL3100 (no MCC), and was an instant, full-on convert to Agile guitars. Pretty soon, I wanted to give an SX a try. Since I'm a bassist, and I had zero interest in Telecasters, or Fender-style guitars in general at that point in my life (those were dark days, I know... makes me shudder just to think about it now! :shock: ), I opted to go with an SX bass instead. I had caught a lot of buzz about them on TalkBass (mostly @Dabbler :D ), and wanted to see if what I heard about them was true. It also helped that they had a Jaguar Bass clone (of sorts) too.

When Fender came out with the Jaguar Bass in 2006, I instantly wanted one... In particular, the one with the 3TS finish.

Image

I didn't care for the other finishes, but the sunburst one was only available in Japan! In the US, you could choose between bright, obnoxious red (Race Red?), or black. The Race Red hurt my eyes, and I had already had my fill of black guitars, so I figured I'd just wait until they started showing up on the used market, because while I wouldn't say they were particularly expensive (I think they cost like $700 or $800 at the time, which was typical for CIJ Fenders), it was more money than I was willing to spend on a bass just because it looked cool. Besides, I had 2 Jazz Basses already (the original Jaguar Basses had two J pickups instead of the P/J config they have now), and I had no use for all the extra bells and whistles that bass had, either.

I was hoping that the bass would become popular (and it did), because that would mean that there would probably be a Squier version, and other companies would start making copies of it (which they did). Then one day, while perusing the (then) extensive selection of bass guitars on Rondo, I came across the SX SJMB-62 in a 3TS finish!:

Image

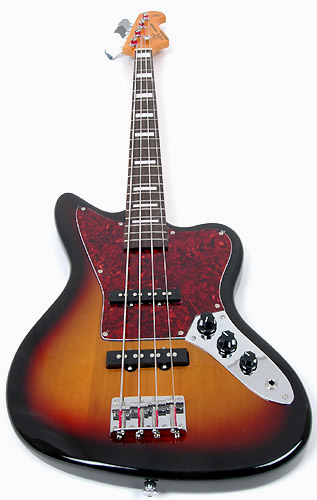
It had an ugly red tort pickguard on it, but I could change that (I didn't for like 7 or 8 years), but most importantly, it had a sunburst finish, and it only cost $150, so I bought it.

The bass itself was great, but everything on it was not, so I gathered up all the replacement parts (which was a dodgy proposition back in those days), and the story begins here.

P.S. This thread is pretty pic-heavy, and since there's a 5-pic-upload-per-post limit here, I'm going to have to break this up into several posts.


================================================================================================================


July 7, 2008


Ok, the first part of my mods are complete... I started with this...

CJ mod 1.jpg
CJ mod 1.jpg (20.74 KiB) Viewed 950 times

It‘s recommended that you take the strings off before removing the bridge.

CJ mod 2.jpg
CJ mod 2.jpg (17.68 KiB) Viewed 950 times

I didn‘t mention in my review that the stock bridge is also pretty junky.. Made a terrible rattling noise... If you don't replace it with a Badass, I highly recommend you replace it with something else... Anything else!

CJ mod 3.jpg
CJ mod 3.jpg (15.73 KiB) Viewed 950 times

As you can see, the Badass II bridge fits right on there.. No need to re-drill any holes... I love these bridges! I have one on my jazz bass and it just makes it sing! Sustains forever.

Then I shielded all the cavities with shielding tape, remembering to attach a wire to the shielding and solder the other end to a pot to ground it... Otherwise, it‘ll act more like an antenna than a shield.

CJ mod 4.jpg
CJ mod 4.jpg (20.37 KiB) Viewed 950 times

Now here it is with a set of Vintage RI Jazz Bass pups, pulled from a Fender Jaguar bass,
and all new wiring, pots and cap.

CJ mod 5.jpg
CJ mod 5.jpg (22.1 KiB) Viewed 950 times

As you can see, the bridge pickup fits right into the cavity without any problems.. The
route for the neck pup is plenty big, but I did have to trim the cut-out in the pickguard a
little to fit.


Continued...
Finally escaping the People's Republic of Kalifornia!

BANNED BY MOMO
User avatar
Mossman
Reactions:
Posts: 1783
Joined: Wed May 27, 2020 1:46 pm

Now we get her all buttoned up and put the strings back on to adjust and intonate the
bridge...

CJ mod 6.jpg
CJ mod 6.jpg (16.62 KiB) Viewed 943 times

And she‘s all done! Plays and sounds like a dream... As expected, the vintage pups are
warmer with less output (5.3k/5.5k) than standard J —bass pickups...

CJ mod 8.jpg

CJ mod 9.jpg

Ok, so today I got down to the not-so-fun job of stripping the neck of my SX SJMB-62,
and reshaped the headstock into something that looks more like a Fender... Actually, that
part was kinda fun... Here’s the process...

Started with this...

CJ mod 10.jpg
CJ mod 10.jpg (12.55 KiB) Viewed 943 times

Wanted to make it more like this...

CJ mod 11.jpg
CJ mod 11.jpg (10.49 KiB) Viewed 943 times
Finally escaping the People's Republic of Kalifornia!

BANNED BY MOMO
User avatar
Mossman
Reactions:
Posts: 1783
Joined: Wed May 27, 2020 1:46 pm

First, the part that sucks... Stripping the neck... I wasn‘t crazy about the orange tint of the neck and since I wanted to reshape the headstock, I would have to strip it anyway...

CJ mod 12.jpg
CJ mod 13.jpg

It was a real bitch sanding this finish off... I've stripped necks before, but this finish was really thick, and as you can see in these pics, there was a lot of residue that seeped into the wood... Took a long time (and a lot of muscle) to get it completely clean...

CJ mod 14.jpg

Then I marked roughly where I wanted to cut...

CJ mod 15.jpg

Got out the jig-saw and went to it...

CJ mod 16.jpg
Finally escaping the People's Republic of Kalifornia!

BANNED BY MOMO
User avatar
Mossman
Reactions:
Posts: 1783
Joined: Wed May 27, 2020 1:46 pm

Pretty rough cut, but I'm gonna use a Dremel to smooth everything out... I also used it to shave off the excess on the rounded part...
CJ mod 17.jpg


Now, here it is just about finished... The SX headstock is about an inch longer than the Fender headstock, so mine looks a little more elongated, but I think I got it pretty darn close...

CJ mod 22-1.JPG

I ended up shaving a little more off the round part... Made it look just a little sleeker than the Fender.. Y'all probably can't tell the difference, but I can...

CJ mod 22.jpg

I don't think it came out too bad for my first attempt at re—shaping a headstock. But I'm not gonna put a Fender logo on it... This one‘s gonna be a "Hand Made - Mossman Custom"!

Next will be applying the logo and re—finishing the neck....
Finally escaping the People's Republic of Kalifornia!

BANNED BY MOMO
User avatar
Mossman
Reactions:
Posts: 1783
Joined: Wed May 27, 2020 1:46 pm

Well, after a long hiatus, I finally got around to finishing this project, so here's the last
installment of the SX "JagMaster" bass mod project... I‘m real happy with the way it came
out.

After reshaping the headstock and getting everything sanded all smooth as a baby's
bottom, the next step was to apply my logo and re-finish the headstock and neck...

First, I printed out my logo on a sheet of water-slide decal material, using my ink-jet
printer... You'll want to use the highest quality settings and darkness level... You should
print out a bunch of ‘em, because this material is hard to work with and it never does
what you want it to do the first time...

CJ mod 23.jpg

After the ink dried, I sprayed it with an even coat of this stuff (which is also what I used to
finish the headstock and neck.) You want to make sure the ink is completely dry before
spraying.


CJ mod 24.jpg


Then I taped off everything but the surface of the headstock, and applied 2 or 3 coats of
clear, letting it dry between coats...

jag logo 3.jpg

Oooooh.... Shiny!

jag logo 4.jpg

Then cut out one of the decals... Make sure you cut off all corners that might hang over
the edge, or stick out where you don't want it to, because it'll be too gelatinous to trim
after it's wet and off the backing paper...

jag logo 5.jpg
Finally escaping the People's Republic of Kalifornia!

BANNED BY MOMO
User avatar
sabasgr68
Reactions:
Posts: 1484
Joined: Wed May 27, 2020 10:11 pm
Location: Venezuela, Caracas
Gearlist: Mossman Sunking Strat (model MN001) - Zoom G3xn - My hands
Contact:

I´ve just made some coffee, so I´m ready to read the whole story, Ed [mention]Mossman[/mention] !

Love the finish on that bass!
I´m the guy from Venezuela (Not Communist/Socialist) - Catholic - Husband - Father
Looking for online/remote job - Income on the internet
Always grateful to the AGF community and friends
AGF refugee - Banned by MOMO
User avatar
Mossman
Reactions:
Posts: 1783
Joined: Wed May 27, 2020 1:46 pm

Drop it in some warm water for about 10 seconds...

jag logo 6.jpg

Then it should slide right off the paper, onto the surface of the headstock... In theory, that
is... This time, it took me 3 tries to get it right. (a new record!).

jag logo 7.jpg

After it's in position and all the air bubbles are smoothed out, you should let it dry for a
while... Don't worry if the decal doesn't look completely smooth and adhered... As it dries,
the material sucks down onto the smooth surface of the headstock.

Now comes the part where you REALLY have to be patient... You have to BURY the decal
under several coats of clear until you can no longer FEEL the edges of the decal... You'll
still be ablt to SEE the edges... That's ok.. as long as you can't feel them...

You have to start off slow.. If you try to apply too heavy a coat, the edges of the decal will
start to curl.. You can go heavier as the layers build up, but you can't go too crazy.. a real
heavy coat will take a LONG time to harden... it'll be rubbery for a long time... You don't
want that...

Once you get to the point where you can't feel the edges of the decal anymore, spray a
couple more coats on for good measure, because the next step is sanding...
I started with 400 grit sandpaper, then went to 600, 800, up to 1500... Then I used
Meguiare's "Scratch X" to finish it off... Once you start sanding, the edges of the decal will
disappear.

jag logo 8.jpg

Oh, I almost forgot... I also removed the tape and paper and sprayed the back of the neck
and the back and sides of the headstock with Krylon "satin" clear.. (about 3 coats) then I
sanded and buffed it with Scratch X to a dull shine...

jag logo 9.jpg
jag logo 10.jpg

It looks shiny, but it‘s smooth as silk... Now, all the hardware goes back on.
Finally escaping the People's Republic of Kalifornia!

BANNED BY MOMO
User avatar
Mossman
Reactions:
Posts: 1783
Joined: Wed May 27, 2020 1:46 pm

jag logo 11.jpg

It was a bitch getting the bushings back in, due to the build up of clear-coat around the
holes... I had to ream them out with a Dremel a little, and drive them in with a hammer
and a block of wood.

jag logo 12.jpg

Kept the stock tuners... They’re pretty solid... More so than the Fender tuners on my MIM
jazz bass.

jag logo 13.jpg

Bolted the neck back on...

jag logo 14.jpg

Then I put some new string on, set ‘er up, and I‘m done!

The Mossman Custom Jaguar Bass....

jag complete 3.jpg


The story continues....
Finally escaping the People's Republic of Kalifornia!

BANNED BY MOMO
User avatar
Mossman
Reactions:
Posts: 1783
Joined: Wed May 27, 2020 1:46 pm

sabasgr68 wrote: Fri Aug 07, 2020 10:26 pm I´ve just made some coffee, so I´m ready to read the whole story, Ed @Mossman !

Love the finish on that bass!
Thanks Sabas... This will take you through the first phase of mods 12 years ago. I'll bring things up to the present shortly.
Finally escaping the People's Republic of Kalifornia!

BANNED BY MOMO
User avatar
Mossman
Reactions:
Posts: 1783
Joined: Wed May 27, 2020 1:46 pm

I played that bass as it was for a number of years, but I wasn't done with it. First of all, I hated that damn red tortoise PG, but I didn't know what I wanted to replace it with. I thought a black pickguard would make it look too dark, and I don't like plain white pickguards. I considered creme pearloid, but I thought that would be too "busy", and pearloid PGs were kinda expensive back then for some reason. At some point, I came across a picture of a '57 P-bass with a sunburst finish and a gold aluminum PG (much like the picture below), and had a "eureka" moment:


Image


I thought gold looked way cool and retro on a tobacco sunburst, but I wanted to be sure I would like it, so I painted the stock pickguard gold to see what it would look like first (sorry, I don't have any pictures of it, it didn't last very long). I liked the color combination, but I didn't like the feel of the paint, and I knew it would wear off in spots over time, so I hit up Tony at Pickguardian (TWANG had long stopped making pickguards at this point) and I had him make me a clear acrylic PG, back-painted in gold, and it was exactly what I had in mind.

OG jag body 2 rs.jpg
OG jag full tree rs.jpg
OG jag full rock rs.jpg

Another change that I made around this time was to rebrand the headstock (the second of three). I had originally used the name "Mossman", but in the intervening years, I found out about Stuart Mossman, a luthier who was renowned for his acoustic guitars. I think John Denver played his guitars almost exclusively, and Eric Clapton was also a fan of his guitars. Unfortunately, Stuart developed a sensitivity to nitro cellulose lacquer, and had to stop building guitars, but his business still carries on.

It didn't feel right to keep using the Mossman name (and frankly, I felt lke I could use the practice applying decals and doing finish work), so I reverted to a name that I came up with back when I built my first Tele (before I was a member of this forum, or started using the name "Mossman" online).

Earth hs 2.jpg

By this time, I had found sources to print waterslide decals with metallic inks. I wasn't too crazy about this one (or the seller), but it looked better than what I could print out on my inkjet printer.

earthling jag headstock rs.jpg
Finally escaping the People's Republic of Kalifornia!

BANNED BY MOMO
User avatar
Mossman
Reactions:
Posts: 1783
Joined: Wed May 27, 2020 1:46 pm

Now I had fallen in love with the sound of this bass from the moment I affected my first mods, and it quickly became my #1. Everybody loved this bass. The guys in my band liked it better than my Fenders (and definitely better than the Rickenbacker... They hated that bass, and groaned whenever I showed up at practice with it). But I was starting to have problems with the neck... I think I ganked it by changing back and forth between flat and round-wound strings too often. I also lived in New England and had to adjust the truss rod frequently due to humidity and climate changes, and after about 11 years, it eventually ran out of travel. Plus the nut had gotten kinda stripped out, and I had to face the reality that the bass needed a new neck. I suppose I could have gotten some more life out of it by adding some washers, but that would just be kicking the can a little further down the road. Besides, I never liked the cheap, bland, "pearloid" inlays that they used, anyway.

I wanted to get another neck with block pearloid inlays, but that can be a spendy proposition. Fortunately, I had some time... The neck didn't require immediate replacement. It still had a good setup, and I had moved to California by that time, so I very rarely had to adjust the truss rod due to humidity or climate changes, but I knew it was only a matter of time before it would be a necessity.

I had been thinking about getting another one of these basses (now called "Ursa 4") as a backup...

ursa4SG.jpg

...but found myself wishing that it came with a maple fretboard with black block inlays (the story of that project will be in an upcoming thread). Then it hit me... It's a lot easier (and cheaper) to get a maple board/black block Jazz Bass neck than one with rosewood and pearloid blocks, and realized that I could take the rosewood neck off of the Ursa 4 and put it on the SJMB-62, and pick up a '70s VM or CV neck for the Ursa 4.

Brilliant!

Of course, the one I wanted (in Surf Green) was out of stock, and would be for a very long time, but while I was waiting, some of these showed up in the "Parts/Bodies" page on the Rondo site:

rondo bass neck.jpg

I prefer SX bass necks over Squier necks (unless it has that awful paddle headstock). I've never had to touch a single fret on an SX neck, whereas wonky frets are a little more common with Squier. Also, I just like the feel of SX necks better... Squier necks tend towards slimmer profiles, while SX necks have more girth to them.

So I snatched up that neck, and reshaped and refinished the headstock while I was waiting for the Ursa 4 to come back in stock. When it finally arrived, I began the transition process almost immediately. This neck has the latest "swoop" headstock, which doesn't bother me, so I didn't reshape it, but I did want to put the "Mosstone" logo on it. Because of the curves of this headstock, the full decal with "Custom Jag" at the end didn't look so good, so I cut it off. But in my head, this called the "OG Custom Jag".

OG jag headstock refin.jpg

The inlays on these new necks are a great improvement over the old inlays. The old ones were just murky white plastic with almost no pearloid figuring, and was really my only gripe about the bass that I couldn't change (I tried those "inlay stickers" once, but took them off after a couple of weeks). These new inlays look beautiful by comparison.

Old:

old jag inlay.jpg

New:

new jag inlay.jpg
Finally escaping the People's Republic of Kalifornia!

BANNED BY MOMO
User avatar
Mossman
Reactions:
Posts: 1783
Joined: Wed May 27, 2020 1:46 pm

So here's some fresh, current pics of my #1 as it is today. I think I'm finally done making changes to this bass!


new jag full h rs.jpg
new jag body 1.JPG

new jag full ang 1 rs.JPG

new jag body h 1 rs.JPG

new jag headstock 1 rs.JPG
Finally escaping the People's Republic of Kalifornia!

BANNED BY MOMO
User avatar
Mossman
Reactions:
Posts: 1783
Joined: Wed May 27, 2020 1:46 pm

BTW, for anyone who was wondering; yes, I was more than a little concerned that the neck swap would negatively affect the sound of the bass, but she roars just as mighty as ever. If anything, I think the new neck actually improved the tone, but it's hard to be objective about that. However, it was a gamble. It could have easily gone the other way. Overall, I think this neck is a big improvement over the original neck.
Finally escaping the People's Republic of Kalifornia!

BANNED BY MOMO
User avatar
Mossman
Reactions:
Posts: 1783
Joined: Wed May 27, 2020 1:46 pm

Just for fun, I made this pic comparing the Mosstone to the Fender. I think I like the look of mine better. It looks a lot cleaner without all the dials, and switches, and chrome plates. I can understand the purpose of the alternate tone circuit on Jaguar guitars and Jazzmasters, for that muted jazz tone, but I don't know why a bass needs that.

MvF Jags.JPG
Finally escaping the People's Republic of Kalifornia!

BANNED BY MOMO
User avatar
nomadh
Reactions:
Posts: 1760
Joined: Wed May 27, 2020 1:32 pm
Gearlist: My Gear:Electric
Gibson '13 studio dlx hsb
Gibson '79 flying V
Gibson '06 sg faded
Gibson '15 LP CM w gforce
Epiphone Casino coupe
Epiphone dot studio
Fender USA strat w mjt body _w Original body 81
Fender lead II
Firefly spalted 338
Squier affinity tele bsb
Squier strat std relic
Squier subsonic baritone
Agile al2500 albino
Agile al3001 hsb
Sx ash Ltd strat
Sx ash strat short scale
Sx ash tele
Sx callisto jr
Dean vendetta
Washburn firebird. Ps10
Johnson trans red strat
Johnson jazz box Vegas
Seville explorer
Inlaid tele
flametop bigsby tele wood inlaid neck
23

Acoustics
new Eastman acoustic
Sigma dm3 dread x2 (his and hers)
Fender 12 str
Ibanez exotic wood
Silvercreek rosewood 00
Ovation steel str
martin backpacker acoustic
Johnson dobro

Did you use the maple w black blocks for awhile? How was that one. That's the look I want to do sometime.
User avatar
Mossman
Reactions:
Posts: 1783
Joined: Wed May 27, 2020 1:46 pm

nomadh wrote: Sun Aug 09, 2020 12:14 pm Did you use the maple w black blocks for awhile? How was that one. That's the look I want to do sometime.
For a while? I'm still using it. :D

I think maybe I wasn't very clear... I took the rosewood neck from the Surf Green Jag to use on this bass, and put the maple neck on the Surf Green Jag.

It now lives here: https://www.aguitarforum.net/viewtopic.php?f=27&t=866
Finally escaping the People's Republic of Kalifornia!

BANNED BY MOMO
Post Reply