
Martin D-18ish Acoustic Build
-
TheIrritableLuthier
- Reactions:
- Posts: 142
- Joined: Wed May 27, 2020 5:57 pm
After getting the jig and the work piece perfectly perpendicular to the saw blade and making the cut, it's a simple flip around to the backside of the neck blank, add some glue and clamp it all up.

-
TheIrritableLuthier
- Reactions:
- Posts: 142
- Joined: Wed May 27, 2020 5:57 pm
Routing the truss rod channel, as well as some minor fitting for the truss rod nut.


-
TheIrritableLuthier
- Reactions:
- Posts: 142
- Joined: Wed May 27, 2020 5:57 pm
Here's the curly ebony fretboard blank I'll be working with. It remains to be seen how much of the figuring will be visible in the finished product but to start with it looks quite nice.

-
TheIrritableLuthier
- Reactions:
- Posts: 142
- Joined: Wed May 27, 2020 5:57 pm
After establishing a center line, I layed out the fret slots and got to work cutting said slots.


-
TheIrritableLuthier
- Reactions:
- Posts: 142
- Joined: Wed May 27, 2020 5:57 pm
Multi tasking now between the neck and body. Here I'm applying shellac, super blonde in a 2 lb cut. This results in a slight amber color, and serves the purpose of sealing the body and filling the pores. I apply a few coats of shellac, then sand it back. Repeat a few times and the pores are filled.
Starting to look pretty sweet!


Starting to look pretty sweet!
-
TheIrritableLuthier
- Reactions:
- Posts: 142
- Joined: Wed May 27, 2020 5:57 pm
Back to the neck. Time to route the dovetail. The end result is off center but I didn't pick up on that right away. It'll come back to bite me in the ass later.


-
TheIrritableLuthier
- Reactions:
- Posts: 142
- Joined: Wed May 27, 2020 5:57 pm
A few things going on in this pic. I've trimmed off the excess material, plugged the end of the truss channel with some maple, and drilled and installed a threaded insert. The neck joint is going to be a mix of modern and traditional. A tight dry dovetail joint with a bolt for security, with a glued on fretboard extension. This will make for an easy reset years in the future.
My hope for the insert was both off center and not parallel to center. I was able to rotate the insert inside the hole to at least be parallel, but the bolt itself is quite off center now. Not a big deal, but I need to do better next time.
Not shown in pics, but I followed this up by plugging the hole with a dowel and redrilling a 1/4" hole for the bolt. The insert is now permanently embedded in the neck.
-
TheIrritableLuthier
- Reactions:
- Posts: 142
- Joined: Wed May 27, 2020 5:57 pm
A quick test fit of the neck. This is where I realized my truss rod channel is off center on the neck, by about 1/16". More accurately, my dovetail was cut off center. So I have some tweaking to do on my jig.
I can move the centerline of the neck, that's not a huge issue, but I can't abide an off center truss channel. So, I ended up filling and rerouting the truss channel.

I can move the centerline of the neck, that's not a huge issue, but I can't abide an off center truss channel. So, I ended up filling and rerouting the truss channel.

-
TheIrritableLuthier
- Reactions:
- Posts: 142
- Joined: Wed May 27, 2020 5:57 pm
Time to glue the fretboard and headstock plate on.


-
TheIrritableLuthier
- Reactions:
- Posts: 142
- Joined: Wed May 27, 2020 5:57 pm
Next up, route and sand the headstock to shape, and route neck down to the taper of the fret board.


-
TheIrritableLuthier
- Reactions:
- Posts: 142
- Joined: Wed May 27, 2020 5:57 pm
After that I roughed out the curve on the heel on the band saw and cut the taper on each side of the heel by hand.

-
TheIrritableLuthier
- Reactions:
- Posts: 142
- Joined: Wed May 27, 2020 5:57 pm
Roughed out the heel carve here. Still needs some refinement at this point.

-
TheIrritableLuthier
- Reactions:
- Posts: 142
- Joined: Wed May 27, 2020 5:57 pm
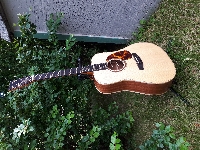
Back to the body for the spraying of the water based lacquer top coat. Love the way the grain pops!


-
TheIrritableLuthier
- Reactions:
- Posts: 142
- Joined: Wed May 27, 2020 5:57 pm
Here I've thicknessed the headstock and drilled the tuner holes.

-
TheIrritableLuthier
- Reactions:
- Posts: 142
- Joined: Wed May 27, 2020 5:57 pm
Then I pre installed the tuners so I wouldn't have to worry about any finish damage later on.

-
TheIrritableLuthier
- Reactions:
- Posts: 142
- Joined: Wed May 27, 2020 5:57 pm
Time to carve the neck profile. I design the desired profile at the 1st and 10th fret, then lay out facet lines on the neck to give me a guideline that I can file to to remove material. This is a very common technique, lots of info on the net if you're interested in how it works.


-
TheIrritableLuthier
- Reactions:
- Posts: 142
- Joined: Wed May 27, 2020 5:57 pm
After a lot of filing, rasping and sanding, here's the finished neck carve, including volute and heel.


-
TheIrritableLuthier
- Reactions:
- Posts: 142
- Joined: Wed May 27, 2020 5:57 pm
Adding and shaping the heel cap.


-
TheIrritableLuthier
- Reactions:
- Posts: 142
- Joined: Wed May 27, 2020 5:57 pm
Cleaning up the nut slot and fitting the nut blank. I'll shape the nut itself at the end of the build.

-
TheIrritableLuthier
- Reactions:
- Posts: 142
- Joined: Wed May 27, 2020 5:57 pm
Added side dot inlays.

-
TheIrritableLuthier
- Reactions:
- Posts: 142
- Joined: Wed May 27, 2020 5:57 pm
The neck is ready for finishing. More coming soon.

-
TheIrritableLuthier
- Reactions:
- Posts: 142
- Joined: Wed May 27, 2020 5:57 pm
Ok, finally. I'm now caught up to where I was at before the old AGF went up in flames, although this thread is a bit lighter on commentary on my part, which is probably a blessing for anyone who reads this, lol.
So what have I been doing in the last week to week and a half since then? A lot of hurry up and wait going on. The finish on the body needed to cure all last week, so mostly I kept myself busy on smaller tasks.
The main task was starting the finish on the neck. The headstock was sprayed in the same lacquer as the body. I applied 3 coats then my new logo, and 9 more top coats to bury it. Its currently curing now too. This weekend I'll flat sand and polish it all back up.
Interestingly, I thought this headstock template was ebony with some brown streaks. I was sent this in error when I ordered an ebony bridge blank, so I assumed they just picked an ebony headstock plate by mistake. As soon as I got clear on it though, it didn't seem like ebony anymore. It looks more like rosewood to me. Oh well, it looks good whatever it is.
-
TheIrritableLuthier
- Reactions:
- Posts: 142
- Joined: Wed May 27, 2020 5:57 pm
From there I spent some time making the bridge and a truss rod cover. If I factor in labor costs, you're looking at the world's most expensive trust rod cover. I just can't abide putting a piece of plastic on something I've worked this hard on, and working with something that small and making it wood means I can't just bang it out with a router and template.
It looks nice in the end though. Both the bridge and cover are ebony, and the cover has a thin bottom layer of sapele, chamfered around the edges to give a slight brown border. I've ordered some micro mesh sanding pads to polish these up a bit more yet.


It looks nice in the end though. Both the bridge and cover are ebony, and the cover has a thin bottom layer of sapele, chamfered around the edges to give a slight brown border. I've ordered some micro mesh sanding pads to polish these up a bit more yet.