Sawdust, Solder, and Swear Words
-
pbrommer
- Reactions:
- Posts: 21
- Joined: Fri May 29, 2020 1:04 pm
I finally thought of a catchy title to start documenting my idiocy and move the bobbin discussion here. I'll try to document all of my add-riddled, stream of conscious writing, and general tinkering in here. So buckle in weirdos, let's get cracking
-
pbrommer
- Reactions:
- Posts: 21
- Joined: Fri May 29, 2020 1:04 pm
So, in the bobbin winding thread, I 3D printed 3 toaster-like bobbins to fit under the toaster covers of my wolf wrk300 (was Bubba z's!). The pickups are a weird single coil - I'll get pictures soon.
I summoned the great trifecta of wonders: mozz, Buddha, and Andrew area to wind the bobbins. I have the magnets, they have the winding skill. Each has wound to their ability and sent it back, with Andrew's back first.
I learned a hard lesson - press fit the magnets FIRST before winding or make sure you have enough support. It looks like when I went to press one in, the structure gave, snapped, and tore through the top part of the wind in the corner.
I'll update with more pictures when I have time. Have to herd the kiddos to bed and get some sleep. Time change is kicking my butt.
-
BatUtilityBelt
- Reactions:
- Posts: 1899
- Joined: Thu May 28, 2020 4:25 pm
I have not done this with pickup bobbins specifically (though I have printed a few bobbins), but this may help... I have found that if there are going to be any stresses to the finished part, there may be a risk of the 3D printed part delaminating at the most stressed areas. It sounds like that may have happened to your bobbin. To avoid this on anything beyond a simple prototype (so if I'm doing several or more), I will 3D print a mold negative, pour a (typically silicone) rubber mold around it, then cast the parts from the rubber mold. Even though they still look like the 3D printed part on their surface, they don't delaminate.
-
pbrommer
- Reactions:
- Posts: 21
- Joined: Fri May 29, 2020 1:04 pm
I think that might have been the issue, coupled with the fact the holes were a really tight fit and I don't think there was enough spacing around where the wind was. I think the tightness of the wind pulled in on the inside of the bobbin and made that end. The first magnet was no trouble.
I've enlarged the holes by .001 and added .05 around the entire center where the wind is. Tomorrow I'll print it with a bit more support on the inside and see if @andrewsrea can wind it again with the magnets in place (which I now have). I guess you live and learn.
Here's to it working out tomorrow when I print. And here's to another wind: I guess (hard for me to admit), it's just wire and plastic.
-
andrewsrea

- Reactions:
- Posts: 1535
- Joined: Wed May 27, 2020 4:43 pm
- Location: Lake Saint Louis, MO
- Gearlist: 28 Guitars: (2) basses, (2) acoustics, (3) hollow bodies, (3) Semi hollow, (1) Double-neck, (17) Solid-bodies
Through my own tough breaks over the years, I really pay attention to what I call 'layout,' a.k.a 'does it fit?'pbrommer wrote: ↑Thu Nov 11, 2021 8:20 pm I think that might have been the issue, coupled with the fact the holes were a really tight fit and I don't think there was enough spacing around where the wind was. I think the tightness of the wind pulled in on the inside of the bobbin and made that end. The first magnet was no trouble.
I've enlarged the holes by .001 and added .05 around the entire center where the wind is. Tomorrow I'll print it with a bit more support on the inside and see if @andrewsrea can wind it again with the magnets in place (which I now have). I guess you live and learn.
Here's to it working out tomorrow when I print. And here's to another wind: I guess (hard for me to admit), it's just wire and plastic.
FYI: a dry fit of the magnets w/ no coil winds should be a little loose. The wind will squeeze the bobbin around the magnet a little and yuo can always use a white glue diluted with water wiped onto each magnet, or drip a little super glue around the bottom of the magnet, to hold it in place.
Live life to the fullest! - Rob
-
pbrommer
- Reactions:
- Posts: 21
- Joined: Fri May 29, 2020 1:04 pm
Update:
Mozz's bobbin is in and ready to be wired.
I didn't destroy Budda's bobbin, BUT.... the magnets are too long. D'Oh So, I'll have to route a bit of the cavity out to let the magnets fit.
All good so far, but this week has been busy (who's hasnt?). I'll have more updates in the future if life slows down and gives me time to update.
-
nomadh

- Reactions:
- Posts: 1781
- Joined: Wed May 27, 2020 1:32 pm
- Gearlist: My Gear:Electric
Gibson '13 studio dlx hsb
Gibson '79 flying V
Gibson '06 sg faded
Gibson '15 LP CM w gforce
Epiphone Casino coupe
Epiphone dot studio
Fender USA strat w mjt body _w Original body 81
Fender lead II
Firefly spalted 338
Squier affinity tele bsb
Squier strat std relic
Squier subsonic baritone
Agile al2500 albino
Agile al3001 hsb
Sx ash Ltd strat
Sx ash strat short scale
Sx ash tele
Sx callisto jr
Dean vendetta
Washburn firebird. Ps10
Johnson trans red strat
Johnson jazz box Vegas
Seville explorer
Inlaid tele
flametop bigsby tele wood inlaid neck
23
Acoustics
new Eastman acoustic
Sigma dm3 dread x2 (his and hers)
Fender 12 str
Ibanez exotic wood
Silvercreek rosewood 00
Ovation steel str
martin backpacker acoustic
Johnson dobro
Fun title. Now get to work and post an update 
-
pbrommer
- Reactions:
- Posts: 21
- Joined: Fri May 29, 2020 1:04 pm
Okay, so it's been really hectic the past month-ish. Here's a link to a folder with some fun pictures of the work: https://bit.ly/3frLSfX
Accomplishments:
No more broken pickup bobbins. Mozz and Buddha's installed, andrewsrea is hanging out waiting for a home. The sound really good. Only problem was with the depth of the magnets - I thought I had space (narrator voice: He didn't). So, drilled out a small cavity in the neck.
The pickups sound great so far, but the volume pots are a bit spacy, so I'll probably reflow the joints then replace if needed. The seem to be out of phase, which is kind of fun because you can use the individual pots to kind of "blend" the two pickups and phasey-ness. I'm going to leave it for now. I'll work on clips but (1) I am a horrible player and (2) my go to preamp, old V-Amp Pro is being really wonky and spacey, and (3) I need to find my USB interface.
Also, working on a bunch of pedals (getting ready to use our laser engraver here at work for fun), a multitude of tube based projects, and the never ending stack of wood that wants to become guitars. Really need to make a router base for my Dremel so I can finish working on my son's guitar, but helping coach basketball for his team takes up lots of time.
Have to end here: gotta get rolling here at work.
-
pbrommer
- Reactions:
- Posts: 21
- Joined: Fri May 29, 2020 1:04 pm
Let me help you
Actually, the pictures are huge and I think they might break the internet. *note* Did try a few -- they are over the 4MB limit. My phone takes good quality pictures. I'll have to compress them when I get a chance.
You do not have the required permissions to view the files attached to this post.
-
mickey
- Reactions:
- Posts: 2729
- Joined: Wed May 27, 2020 1:37 pm
- Location: Wausau, Floriduh
I NEVER click on a link like https://bit.ly/3frLSFX because it could be anything.pbrommer wrote: ↑Thu Jan 13, 2022 5:01 pmLet me help you
Actually, the pictures are huge and I think they might break the internet. *note* Did try a few -- they are over the 4MB limit. My phone takes good quality pictures. I'll have to compress them when I get a chance.
There is no indication of where it is sending you.
Could be any SPAM site in Bumfukistan.
NO THANKS!
Gandalf the Intonationer
-
pbrommer
- Reactions:
- Posts: 21
- Joined: Fri May 29, 2020 1:04 pm
I got a bit snarky there, sorry. I shorten so many Google Drive links at work for documents used by teachers that it's a habit.
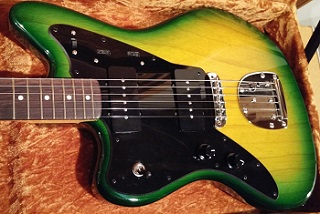
I compressed a couple pictures. I think (if I read the numbering and if it stays in the post correctly), the first picture is the Mozz wound bobbin that went in the bridge. Picture 2 is Buddha's bobbin that went in the neck pickup where I made a small route for the long magnets.
I compressed a couple pictures. I think (if I read the numbering and if it stays in the post correctly), the first picture is the Mozz wound bobbin that went in the bridge. Picture 2 is Buddha's bobbin that went in the neck pickup where I made a small route for the long magnets.
You do not have the required permissions to view the files attached to this post.
-
pbrommer
- Reactions:
- Posts: 21
- Joined: Fri May 29, 2020 1:04 pm
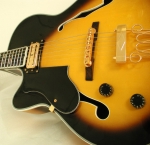
So, a different post to show you what was in the WRK300 before I 3D printed the bobbins. Some of the pictures were too large to compress online, but it's an interesting single coil. Reading about gold foils on TDPRI, this looks like a version of it. It was 7.8K, two small ceramic mini humbuckers underneath, with a steel piece in the middle where the bobbin goes around. I'm thinking this will go in a different guitar hidden in a different pickup cover with alnico magnets. Thinking about the B&G style little sister body I have working in the basement would be a good place for this.
You do not have the required permissions to view the files attached to this post.