
Martin D-18ish Acoustic Build
-
TheIrritableLuthier
- Reactions:
- Posts: 142
- Joined: Wed May 27, 2020 5:57 pm
After drilling the holes, I used a bridge pin reamer to fit the bridge pins perfectly.
-
TheIrritableLuthier
- Reactions:
- Posts: 142
- Joined: Wed May 27, 2020 5:57 pm
Next up, fitting the saddle blank to the slot.

-
TheIrritableLuthier
- Reactions:
- Posts: 142
- Joined: Wed May 27, 2020 5:57 pm
Lastly for last night, I spent some time micro meshing the back and sides. It could still benefit from a proper buffing, but this will have to do for now. My goal is to get a proper buffing arbor for next build.

-
TheIrritableLuthier
- Reactions:
- Posts: 142
- Joined: Wed May 27, 2020 5:57 pm
The first step for today, was make a nut.

-
TheIrritableLuthier
- Reactions:
- Posts: 142
- Joined: Wed May 27, 2020 5:57 pm
Then, I went head down and raced to the finish line. Translation: i didn't take pics.
Not shown:
- installing the tuners
- radiusing the top of the saddle
- filing intonation points onto the saddle.
- string it up and check nut slot depth, action, intonation.
- file nut slots to depth
- adjust intonation in the saddle.
- adjust action by reducing the height of the saddle from the bottom
- polishing the nut and saddle
- final installation of the saddle, nut and truss rod cover.
-
TheIrritableLuthier
- Reactions:
- Posts: 142
- Joined: Wed May 27, 2020 5:57 pm
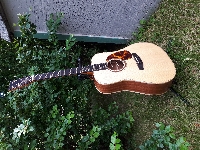
With that, it's a fully functioning guitar. I still need to take care of the dings in the top, and install a pick guard. I'm waiting for that to arrive from stewmac, but it appears to be lost in shipping at this point.
I'm super pumped with how this turned out. Great action, and it sounds really good.


I'm super pumped with how this turned out. Great action, and it sounds really good.

-
TheIrritableLuthier
- Reactions:
- Posts: 142
- Joined: Wed May 27, 2020 5:57 pm
After thinking about it for a couple days, I've decided I'm not going to attempt to fix the few dings in the finish. They're in the clear coat only, so you only see them if the light is just right right, and there's going to be even more character marks added as time goes by anyways. If I was selling this, then I'd definitely want to do something about them, but since I'm keeping it, I think I'll accept it for how it is.
Also, my lost in shipping pick guard showed up in the mail today, so I was able to put the final touch on this build.
Thanks to everyone who commented and enjoyed this build. I'm taking a break for a few weeks, then I'll be starting build number 6. Look out for a new thread soon!


Also, my lost in shipping pick guard showed up in the mail today, so I was able to put the final touch on this build.
Thanks to everyone who commented and enjoyed this build. I'm taking a break for a few weeks, then I'll be starting build number 6. Look out for a new thread soon!
-
uwmcscott

- Reactions:
- Posts: 1524
- Joined: Wed May 27, 2020 1:45 pm
- Location: Northern Wisco
- Gearlist: A few LP's, a Strat, a Tele and a few acoustics.
That is simply amazing, thank you for sharing. It gives one a good sense of why handcrafted acoustics cost as much as they do.
AGF Survivor Champ Emeritus (Ask TVVoodoo )