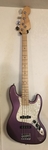
Last 3 days off work, Been finishing tru oil on last 2 bodies, 3-4 thin coats total.
adding vintage tuners to 3 new necks,
assembling those 7.25 necks to bodies, trying to ensure best 2-7/32 bridge and "E to e" string layout on new necks. They all have plenty of room.
Been moving loaded pickguards w/ best pups into these new bodies, from my other Squire CVs, which will sell soon.
New nuts all finished for good intonation between open and 1st fret,
Final set up on all 4.
White CV 50 body with new 7.25 neck has 54mm Wilkinson 5+1 bridge which fit the former Squier 2-1/16 screw holes with the exception of needing to fill and redrill the low-E hole. All 5 others fell within 5+1 oval screw holes I like the 54 mm string spacing very much.This guitar now has CS 69's. I had a former set with 6 ohm CS69's and a hooter D-Allen bridge. Those in neck and mid lost too much of the glassy-ness I like CS69s for. ( the 6.0 reading is rare for CS69, I think. Most I've had were less than 5.5 ohm) Moved one of my two 6.0 to bridge position and went back to my other older 5.3 ones for neck and mid. The glassy-ness is back in neck and mid and 6.0 sounds good for bridge. I'll have a duplicate set to give, in another white partscaster, to a good friend's son who is getting into playing electric.
The 3 new bodies ring-out really well. I wonder if the strings ring better with more space between them. And/or, good light alder bodies.
These have Klein 65, Klein 59, and a Amalfitano custom ordered set.
I have 3 branding irons. Buffalo, galloping horse, and cat shaped. I may fire brand these new bodies before too long. Maybe just the backsides, and/or headstocks. Could make buffalo and horse herds.
Whats on your work bench?
-
Partscaster

- Reactions:
- Posts: 1558
- Joined: Thu May 28, 2020 12:41 pm
- Location: Mars: Sector 6
You do not have the required permissions to view the files attached to this post.
"The man that hath no music in himself, nor is not moved with concord of sweet sounds, is fit for treasons, stratagems, and spoils. The motions of his spirit are dull as night, and his affections dark as Erebus. Let no such man be trusted."
-
mozz

- Reactions:
- Posts: 1165
- Joined: Wed May 27, 2020 1:37 pm
- Location: NE-PA.
#3 in the humbucker series, then you add the Davy Gilmore demagnetizer TMC-1
Wait, USPS delivered my A2 and it's not fully charged? Slackers. Ok, now i zapped it 100%, this is more like it. Now degaussed on the TMC-1 with a wooden spacer, 5%, almost exact. Moral to the story, never assume your magnets you bought are fully charged. You can swap them in and say " I don't like those A2's, I tried them a few times and it sounds too flat and lifeless". This applies to all grades, A2, A3, A4, A5.
Wait, USPS delivered my A2 and it's not fully charged? Slackers. Ok, now i zapped it 100%, this is more like it. Now degaussed on the TMC-1 with a wooden spacer, 5%, almost exact. Moral to the story, never assume your magnets you bought are fully charged. You can swap them in and say " I don't like those A2's, I tried them a few times and it sounds too flat and lifeless". This applies to all grades, A2, A3, A4, A5.
You do not have the required permissions to view the files attached to this post.
AGF refugee
-
mozz
- Reactions:
- Posts: 1165
- Joined: Wed May 27, 2020 1:37 pm
- Location: NE-PA.
Dual princetons. Story is, last year i got all those parts for free, there was almost a complete Fender Princeton sans bare chassis, speaker and cabinet.
Guy on Reverb was making nice repro cabinets, but he was sold out and said April. So while browsing i came across a bare original Silverface cabinet already cut out for a 12". So i bought that. Then 1 week later the guy messages me he is making the princeton cabinets soon and wanted to know if i still wanted the maroon w/wheat grill cloth still. I said yes.
So 2 boards from Hoffmans later i populated 1, then for the second i dug into the stash and used mil spec caps, old carbon comp resistors and old military 1% resistors. Even decided to use the 1956 Alpha spool of cloth covered wire from my dad's 70's tv shop. That will go in the fender, the other will get teflon coated.
Silverface will get stock trannys from Amplified parts which were in the free stuff, a CTS alnico 12" i have here and the maroon wheat face will get a bit hotter tranny i have here (350-350 90ma) and a old early 70's 12" Jensen C12N which i bought 4 out of a Kustom cabinet and a 4-8-16 ohm output transformer.
You do not have the required permissions to view the files attached to this post.
AGF refugee
-
andrewsrea

- Reactions:
- Posts: 1535
- Joined: Wed May 27, 2020 4:43 pm
- Location: Lake Saint Louis, MO
- Gearlist: 28 Guitars: (2) basses, (2) acoustics, (3) hollow bodies, (3) Semi hollow, (1) Double-neck, (17) Solid-bodies
So I found a sawmill with some nice pieces of wood, took a run out there today,
In a couple of weeks I'll be picking up cherry, oak, and maple for another run at my triple stand, and hopefully a spalted blank for a body
In a couple of weeks I'll be picking up cherry, oak, and maple for another run at my triple stand, and hopefully a spalted blank for a body
-
mozz
- Reactions:
- Posts: 1165
- Joined: Wed May 27, 2020 1:37 pm
- Location: NE-PA.
No doubt way over priced for a sliver of wood. I think it's 1/8"x 1/4" x 2.5". I've been cutting them on a old miter box. I actually bought wood from ebay that was 1/8" thick 3" x 12"? Cutting the pieces to 1/4" is easier than cutting 1/4" wood to 1/8".andrewsrea wrote: ↑Fri Jul 03, 2020 10:12 amI've been meaning to cut my own maple spacers. Way over priced to buy.
https://www.ebay.com/itm/16-THIN-SANDED ... 2749.l2649
I just clip off the 3" to 2.5 with a pair of cutters once cut. Only trouble so far was they were too big and had to run them across the belt sander for a second. Pickup in hand to keep trying until it was a snug fit.
If i had a very fine tooth blade i could probably cut them on the table saw a lot quicker, but once you get to tiny pieces like that, your fingers get very close, so you need to make a small pusher bar of sorts or run them with the t square.
AGF refugee
-
rrobbone

- Reactions:
- Posts: 317
- Joined: Fri May 29, 2020 4:42 pm
Arcade so far:
I'll finish and install the cabinet doors today having obtained some hardware.
Then I'll reinforce the bottom edges and install some casters.
Then it's on to final placement of the screen and it's mounting blocks.
After that, I'll mount the speaker system and install shelves in the lower area.
There will be some need for wire path holes drilled or routed. I'll also need (but might not need) to cut a notch in the screen bezel for the remote's IR.
Then after ripping all the electronics back out, it's onto spreading a little (a lot of) bondo to seal it up a bit (sand), followed by some primer (sand again), followed by more primer (more sanding), then possibly even more primer (and some sanding).
I have the bits and bobs of the control harness on the way, but the buttons, joysticks, input encoder, and other controls are a bit pricey so I'll spread those purchases out. I've already obtained the Pi4 I'll be running (for now) along with the monitor, set up my games lists (whew!), and installed the image on an SD card. After I set up and tested the Pi4, it's been difficult to resist diving into the games before I get the cabinet done!
I need to do sommore learning about power options. I'd like to set the whole thing up to power on/boot up with a single switch. I know it's possible, just need to see a how to or two.
Then, it's time to plot and make room for the controls: drill the holes and rout the mortises in the control panel. Lots of praying with this step, I really don't want to crack a large slice of plexi while drilling (it's already cut to size and recessed into the control panel top).
Then it'll be time for paint. As per usual, I have no clue what designs or colors I shall use.
Then to wiring, programming control inputs, and troubleshooting the wiring.
Then it'll be a matter of enjoying the silly thing - and honoring the oft made promise to myself never to work with MDF again.
So far:
Riddles yet to be solved:
Should I cover the screen with a smoked piece of tempered glass? It would protect the monitor to an extent and also help disguise the black areas of the screen where no image exists for games orginally designed for standard CRT ratios. Plus, it's darned classy lookin'.
Do I need speaker cover cloth? The speakers are already covered, and I've already routed a pretty chamfer around them.
Should I install extra buttons on the sides of the control panel to mimic button placement for pinball flippers? There are a lot of V-Pin emulators out there...
You do not have the required permissions to view the files attached to this post.
"What is this place? Where am I?"
-
Partscaster
- Reactions:
- Posts: 1558
- Joined: Thu May 28, 2020 12:41 pm
- Location: Mars: Sector 6
Finished re-assembling a white strat partscaster, with dark rosewood fb.
Its a gift to the son of my friend, boss, and bassman.
New switch, cream/white alder body, CS-69 pups, my favorite Squier 9.5 radius neck ...slim 60's feel, made in Indonesia. Always felt great. dark rosewood.
But I am switched over to 7.25 for strats. This partscaster goes to the friend's son, and a couple awesome CV-60's go to consignment shop.
I need to do some stuff to get them ready.
You do not have the required permissions to view the files attached to this post.
"The man that hath no music in himself, nor is not moved with concord of sweet sounds, is fit for treasons, stratagems, and spoils. The motions of his spirit are dull as night, and his affections dark as Erebus. Let no such man be trusted."
-
dbrian66

- Reactions:
- Posts: 44
- Joined: Thu May 28, 2020 6:35 pm
I have a partscaster I am putting together. Kind of a Brad Gillis inspired guitar. It’s going to look bad ass, hoping it will sound as good as its going to look!
You do not have the required permissions to view the files attached to this post.
-
mozz
- Reactions:
- Posts: 1165
- Joined: Wed May 27, 2020 1:37 pm
- Location: NE-PA.
Found a original Space Invaders upright console today at a yard sale for $100. Looked to be in nice shape. I didn't buy it, wish i had the space and/or time. Guy said it used to work but something was wrong with it, somebody was supposed to come fix it but never did, so it still sits there. I think there is enough info out there on these i could get the schematic. Problems are probably well known and fixes are probably just capacitor replacements.rrobbone wrote: ↑Fri Jul 03, 2020 5:41 pm Arcade so far:
I'll finish and install the cabinet doors today having obtained some hardware.
Then I'll reinforce the bottom edges and install some casters.
Should I install extra buttons on the sides of the control panel to mimic button placement for pinball flippers? There are a lot of V-Pin emulators out there...
AGF refugee
-
LancerTheGreat

- Reactions:
- Posts: 279
- Joined: Wed May 27, 2020 11:46 pm
- Location: Where the Bluegrass Grows
- Gearlist: -Guitars-
Gibson Dave Mustaine Flying V EXP
ESP LTD DV8R Dave Mustaine Signature Model
ESP LTD V401DX
Agile AL3100
Kit Explorer
Jackson JS32RR
TWANG Tele
Samick Strat
Firefly Semi-Hollow Tele
Globe Dove Copy
-Amps-
Orange OR-15 (Head)
EVH 112 (Cabinet)
Bugera 1960 Infinium (Head)
Bugera 412 (Cabinet)
Peavey VTX Classic 212 (Combo)
Laney Mini-ST Lionheart Practice Amp
Lately, I've been building gaming PC's.
Just kinda getting railroaded into it for free (except for 1 out of the last 4 who actually insisted on paying me) because I know how and that's just how people act when you're "the tech guy", I'm not a professional so I don't feel comfortable asking to get paid, but some of these builds have been a solid 5+ hours including cable management and OS setup and everything, and my friends/family acting entitled to my time and skill is getting real old.
Wish I could get around to popping some of the fiddles on the bench, I still gotta do setups all around, it's been 3 or more years since my last good full service of any of my guitars.
Just kinda getting railroaded into it for free (except for 1 out of the last 4 who actually insisted on paying me) because I know how and that's just how people act when you're "the tech guy", I'm not a professional so I don't feel comfortable asking to get paid, but some of these builds have been a solid 5+ hours including cable management and OS setup and everything, and my friends/family acting entitled to my time and skill is getting real old.

Wish I could get around to popping some of the fiddles on the bench, I still gotta do setups all around, it's been 3 or more years since my last good full service of any of my guitars.
~Formerly LookingDownTheCross~
-
rrobbone
- Reactions:
- Posts: 317
- Joined: Fri May 29, 2020 4:42 pm
There are quite a few groups on facebook who do what you're considering and are extremely knowledgeable - like down to the same level of minutia that guitarists get to. I would have zero interest in actually doing what you're proposing, but enjoy watching and cheering on the process of those in the groups. It's a lively and helpful bunch, interested in restoring pinball machines, old arcade cabs, cocktail cabs, and even modding the everloving hell out of the 3/4 sized 1Up Arcade cabinets. The similarities between them and guitarists are remarkable. I would expect them to be very helpful in telling you what to look for, but don't tell them where that cab is until you've decided to pass on the oppo! They'll scoop it up.mozz wrote: ↑Fri Jul 03, 2020 10:17 pmFound a original Space Invaders upright console today at a yard sale for $100. Looked to be in nice shape. I didn't buy it, wish i had the space and/or time. Guy said it used to work but something was wrong with it, somebody was supposed to come fix it but never did, so it still sits there. I think there is enough info out there on these i could get the schematic. Problems are probably well known and fixes are probably just capacitor replacements.rrobbone wrote: ↑Fri Jul 03, 2020 5:41 pm Arcade so far:
I'll finish and install the cabinet doors today having obtained some hardware.
Then I'll reinforce the bottom edges and install some casters.
Should I install extra buttons on the sides of the control panel to mimic button placement for pinball flippers? There are a lot of V-Pin emulators out there...
Personally, I'm far more into building a machine that has a bunch of everything so I can experience the games I always heard about, but never had access to. Multicades and emulation are where it's at, IMHO.
I'm no expert, but depending on the condition of that Space Invaders cab - $100 seems ballpark for the shell alone. If it has the controls, even better deal. It becomes a screaming deal if the original monitor is included, intact, and working. That's often the hardest part of those restorations, it seems.
"What is this place? Where am I?"
-
andrewsrea
- Reactions:
- Posts: 1535
- Joined: Wed May 27, 2020 4:43 pm
- Location: Lake Saint Louis, MO
- Gearlist: 28 Guitars: (2) basses, (2) acoustics, (3) hollow bodies, (3) Semi hollow, (1) Double-neck, (17) Solid-bodies
Thanks for the link! I have a scroll saw with a fine jewelers' blade that I was planning on setting up a gate for the 1/4" cut and not having to worry about my fingers as much as you would with a table saw.mozz wrote: ↑Fri Jul 03, 2020 1:59 pmNo doubt way over priced for a sliver of wood. I think it's 1/8"x 1/4" x 2.5". I've been cutting them on a old miter box. I actually bought wood from ebay that was 1/8" thick 3" x 12"? Cutting the pieces to 1/4" is easier than cutting 1/4" wood to 1/8".andrewsrea wrote: ↑Fri Jul 03, 2020 10:12 amI've been meaning to cut my own maple spacers. Way over priced to buy.
https://www.ebay.com/itm/16-THIN-SANDED ... 2749.l2649
I just clip off the 3" to 2.5 with a pair of cutters once cut. Only trouble so far was they were too big and had to run them across the belt sander for a second. Pickup in hand to keep trying until it was a snug fit.
If i had a very fine tooth blade i could probably cut them on the table saw a lot quicker, but once you get to tiny pieces like that, your fingers get very close, so you need to make a small pusher bar of sorts or run them with the t square.
Live life to the fullest! - Rob
-
mozz
- Reactions:
- Posts: 1165
- Joined: Wed May 27, 2020 1:37 pm
- Location: NE-PA.
This is the hot Princeton reverb going into a cabinet i got last year. I actually ordered 2 blackface style chassis (lot cheaper than Mojo and others) but coming from Euro it's gonna be a wait. So its a blackface going into a tweed style cabinet with tweed deluxe chassis. I totally forgot what a pain in the ass it is working on a bare chassis. 50 some holes have to be drilled, greenlee chassis punches for the tube sockets, etc. And of course me i am using a oversized power tranny, oversized output, oversized reverb and i also added a choke. Then you have to place everything just right to clear the giant magnet on a C12N Jensen. Then stuff 6 princeton controls and add 2 extras on the front panel. Extra controls are mids (boost) and a negative feedback adj. Should start wiring this week and maybe sound by next friday.
EDIT: Get the drill back out, a fuse holder would be nice. I can remember things like filaments on 6v6's are pins 2 and 7 but can't remember a fuse.
EDIT: Get the drill back out, a fuse holder would be nice. I can remember things like filaments on 6v6's are pins 2 and 7 but can't remember a fuse.
You do not have the required permissions to view the files attached to this post.
AGF refugee
-
mkgearhead
- Reactions:
- Posts: 103
- Joined: Thu May 28, 2020 8:46 pm
I put a speaker out switching jack in my Danalectro Honeytone amp. It sounds pretty good through a 1x12 cab.
You do not have the required permissions to view the files attached to this post.
-
Rollin Hand

- Reactions:
- Posts: 1520
- Joined: Wed May 27, 2020 1:38 pm
Well, I had this project started on the old site. I think I got the kit in 2018.
I painted the body white last summer. Hey, I work slow.
I left my 1/8 inch tape upstairs. If I can get an area of the garage taped off to do the red, it goes on tomorrow.
Then my next update should be due in...2022?
I painted the body white last summer. Hey, I work slow.
I left my 1/8 inch tape upstairs. If I can get an area of the garage taped off to do the red, it goes on tomorrow.
Then my next update should be due in...2022?
You do not have the required permissions to view the files attached to this post.
Elbows up.
-
ID10t

- Reactions:
- Posts: 493
- Joined: Wed May 27, 2020 2:05 pm
- Location: SE AZ
I admire your discipline in making sure that the paint was completely cured.Rollin Hand wrote: ↑Tue Jul 07, 2020 12:16 am Well, I had this project started on the old site. I think I got the kit in 2018.
I painted the body white last summer. Hey, I work slow.
20200706_233733.jpg
20200707_001135.jpg
I left my 1/8 inch tape upstairs. If I can get an area of the garage taped off to do the red, it goes on tomorrow.
Then my next update should be due in...2022?
-
Rollin Hand
- Reactions:
- Posts: 1520
- Joined: Wed May 27, 2020 1:38 pm
Yes....discipline....it was my plan all along...yeah, that's the ticket.....ID10t wrote: ↑Tue Jul 07, 2020 12:29 amI admire your discipline in making sure that the paint was completely cured.Rollin Hand wrote: ↑Tue Jul 07, 2020 12:16 am Well, I had this project started on the old site. I think I got the kit in 2018.
I painted the body white last summer. Hey, I work slow.
20200706_233733.jpg
20200707_001135.jpg
I left my 1/8 inch tape upstairs. If I can get an area of the garage taped off to do the red, it goes on tomorrow.
Then my next update should be due in...2022?
It will not be dead on. Some of the dimensions are off, so the lines cannot go on perfectly. To be honest, I found this liberating, as it can't be perfect, so I don't have to worry about it being perfect.
I am supposed to jam with a buddy soon. I am kind of hoping that I can get this beast built by then, just to surprise the poop out of him, but life gets in the way. On va voir.
Elbows up.
-
glasshand

- Reactions:
- Posts: 802
- Joined: Fri Jun 12, 2020 10:53 am
- Location: NYC, the center of the universe
- Contact:
I think you may be my good twin. I also got a single-humbucker body that I painted white last summer that is still waiting to be completed...Rollin Hand wrote: ↑Tue Jul 07, 2020 12:16 am Well, I had this project started on the old site. I think I got the kit in 2018.
I painted the body white last summer. Hey, I work slow.
-
glasshand
- Reactions:
- Posts: 802
- Joined: Fri Jun 12, 2020 10:53 am
- Location: NYC, the center of the universe
- Contact:
Last night I put my Jazz Bass Special on the workbench, because I wanted to replace the extremely janky pickup foam and to shield the electronics cavity. Despite my best efforts, I managed to break the leads on BOTH pickups where they attached to the bobbins, because these pickups (some old SD Basslines) have brittle, hair-fine leads that are attached to a tiny, tiny solder point with no shield or strain relief. This is something like the third time they've broken, and I think I'm done with them. So I have ordered myself an Epic Custom Shop PJ set, and we'll see when those arrive. I may try fixing the Basslines if I find myself with absolutely nothing to do.
-
Rollin Hand
- Reactions:
- Posts: 1520
- Joined: Wed May 27, 2020 1:38 pm
Well, the raping is done, and, as expected life (and humidity) are preventing further paintwork.glasshand wrote: ↑Tue Jul 07, 2020 4:10 pmI think you may be my good twin. I also got a single-humbucker body that I painted white last summer that is still waiting to be completed...Rollin Hand wrote: ↑Tue Jul 07, 2020 12:16 am Well, I had this project started on the old site. I think I got the kit in 2018.
I painted the body white last summer. Hey, I work slow.
My vacation ends on Monday, and I am hoping to have it done by then, black paint and all, so I kind of need to paint tomorrow.
Elbows up.
-
ID10t
- Reactions:
- Posts: 493
- Joined: Wed May 27, 2020 2:05 pm
- Location: SE AZ
Damn spell check!Rollin Hand wrote: ↑Tue Jul 07, 2020 8:17 pmWell, the raping is done, and, as expected life (and humidity) are preventing further paintwork.glasshand wrote: ↑Tue Jul 07, 2020 4:10 pmI think you may be my good twin. I also got a single-humbucker body that I painted white last summer that is still waiting to be completed...Rollin Hand wrote: ↑Tue Jul 07, 2020 12:16 am Well, I had this project started on the old site. I think I got the kit in 2018.
I painted the body white last summer. Hey, I work slow.
My vacation ends on Monday, and I am hoping to have it done by then, black paint and all, so I kind of need to paint tomorrow.
-
glasshand
- Reactions:
- Posts: 802
- Joined: Fri Jun 12, 2020 10:53 am
- Location: NYC, the center of the universe
- Contact:
Just do what I do:LancerTheGreat wrote: ↑Sat Jul 04, 2020 5:44 am Just kinda getting railroaded into it for free (except for 1 out of the last 4 who actually insisted on paying me) because I know how and that's just how people act when you're "the tech guy", I'm not a professional so I don't feel comfortable asking to get paid, but some of these builds have been a solid 5+ hours including cable management and OS setup and everything, and my friends/family acting entitled to my time and skill is getting real old.
"My normal rate is one hundred dollars an hour."
"But I'm faaaamily!"
"Oh, in that case you qualify for my special friends & family rate of TWO hundred dollars an hour."
-
Rollin Hand
- Reactions:
- Posts: 1520
- Joined: Wed May 27, 2020 1:38 pm
Or damned t tight next to the r. And my phone typing skills are bad.ID10t wrote: ↑Tue Jul 07, 2020 8:52 pmDamn spell check!Rollin Hand wrote: ↑Tue Jul 07, 2020 8:17 pmWell, the raping is done, and, as expected life (and humidity) are preventing further paintwork.
My vacation ends on Monday, and I am hoping to have it done by then, black paint and all, so I kind of need to paint tomorrow.
Elbows up.
-
Rollin Hand
- Reactions:
- Posts: 1520
- Joined: Wed May 27, 2020 1:38 pm
Paint booth "constructed"...
You do not have the required permissions to view the files attached to this post.
Elbows up.