
Martin D-18ish Acoustic Build
-
TheIrritableLuthier
- Reactions:
- Posts: 142
- Joined: Wed May 27, 2020 5:57 pm
Jumping ahead more than a few steps with this pic. Back bracing is complete and the label has been applied.

-
TheIrritableLuthier
- Reactions:
- Posts: 142
- Joined: Wed May 27, 2020 5:57 pm
The back fitted and glued in place, prior to trimming.


-
TheIrritableLuthier
- Reactions:
- Posts: 142
- Joined: Wed May 27, 2020 5:57 pm
The last thing I did before I shelved this before winter. Installing the end flash.

-
TheIrritableLuthier
- Reactions:
- Posts: 142
- Joined: Wed May 27, 2020 5:57 pm
Picking back up on the build after winter, it was time to start the binding. Here I'm thinning the binding down to dimension on my drum sander.


-
TheIrritableLuthier
- Reactions:
- Posts: 142
- Joined: Wed May 27, 2020 5:57 pm
Next is to glue on some BWB purfling.


-
TheIrritableLuthier
- Reactions:
- Posts: 142
- Joined: Wed May 27, 2020 5:57 pm
Then into the bender.


-
TheIrritableLuthier
- Reactions:
- Posts: 142
- Joined: Wed May 27, 2020 5:57 pm
Unfortunately, this happened in the bender. I'm applying heat and moisture to a glue joint so there's always a risk of something like this happening.

-
TheIrritableLuthier
- Reactions:
- Posts: 142
- Joined: Wed May 27, 2020 5:57 pm
To fix it I cut off the mangled piece of purfling, bent a replacement piece on my DIY hot pipe and glued it back in place.


-
TheIrritableLuthier
- Reactions:
- Posts: 142
- Joined: Wed May 27, 2020 5:57 pm
With that sorted, it was time to route binding channels.

-
Rollin Hand

- Reactions:
- Posts: 1528
- Joined: Wed May 27, 2020 1:38 pm
Intellectually I know this is just woodworking, but hot damn this is impressive. Thoroughly enjoying this, as I always enjoy watching someone skilled do something that I can't. Awesome job.
Elbows up.
-
TheIrritableLuthier
- Reactions:
- Posts: 142
- Joined: Wed May 27, 2020 5:57 pm
Thanks!Rollin Hand wrote: ↑Sun May 31, 2020 10:09 pm Intellectually I know this is just woodworking, but hot damn this is impressive. Thoroughly enjoying this, as I always enjoy watching someone skilled do something that I can't. Awesome job.
-
TheIrritableLuthier
- Reactions:
- Posts: 142
- Joined: Wed May 27, 2020 5:57 pm
First pass with the router.

-
TheIrritableLuthier
- Reactions:
- Posts: 142
- Joined: Wed May 27, 2020 5:57 pm
Last pass to accommodate both the binding and a layer of purfling.

-
TheIrritableLuthier
- Reactions:
- Posts: 142
- Joined: Wed May 27, 2020 5:57 pm
The final pass to allow the full depth of the binding.


-
TheIrritableLuthier
- Reactions:
- Posts: 142
- Joined: Wed May 27, 2020 5:57 pm
Here I'm mitering the ends prior to glue up.

-
TheIrritableLuthier
- Reactions:
- Posts: 142
- Joined: Wed May 27, 2020 5:57 pm
The first half of the binding all glued up.


-
TheIrritableLuthier
- Reactions:
- Posts: 142
- Joined: Wed May 27, 2020 5:57 pm
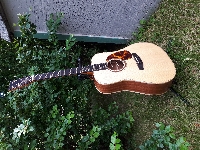
After tons of scraping and sanding, here's the final state of the binding.


-
TheIrritableLuthier
- Reactions:
- Posts: 142
- Joined: Wed May 27, 2020 5:57 pm
One final step. Routing the dovetail socket.


-
TheIrritableLuthier
- Reactions:
- Posts: 142
- Joined: Wed May 27, 2020 5:57 pm
Time to start working on a neck. This will be a 3 piece mahogany neck, with a scarf joint at the headstock.

-
TheIrritableLuthier
- Reactions:
- Posts: 142
- Joined: Wed May 27, 2020 5:57 pm
Here is my scarf joint jig for the table saw in action on a practice piece.
