Lefty Jaguar transplant

Sub forums for Agile/SX, Gibson, Fender, PRS, Epiphone, Douglas, Other guitars and Lessons. If you would like another added contact the Site Admin.
User avatar
BatUtilityBelt
Reactions:
Posts: 1574
Joined: Thu May 28, 2020 4:25 pm

I already have too many guitars, but there is a near-cryptid status lefty I've sought for a while - a traditional Jaguar. Righties probably read this and yawn, knowing they have a plethora of options, but lefties probably just said "ah, yup". If I was paying attention 10 years ago, there were a few, like Fender Japan Jags making it across the waters, but those dried up long ago. And yes, I know I could pay Fender to make me one for about two grand. Since the Cobain model is the only Jaguar I've ever played, I'm not convinced I'd like one enough to justify that price tag. I think Music Zoo or Chicago Music Exchange had a limited special run of lefties I missed entirely due to being too busy at the time.

For over a year, I went seeking kits and used, and found nothing but dead ends. But I kept watching. Every time I googled, I saw a ton of other lefties in the same bind across many forums, with no resolutions. But I am nothing if not stubborn, and this week I saw some daylight. No, nobody is selling a mint lefty Jaguar for $750. But I saw two things that made perfect sense together. Pro Audio Star was selling a mint Squier CV 70's Jaguar for $279.99, and USA Made Guitars was selling a beautiful lefty Alder Jaguar body for $150.00. So for under $500, I can have most of the parts for a reverse headstock custom Jaguar. Nice.
1.jpg
+
USA Guitars Body Front.jpg
I will have to make the pick guard, and I will probably have to make the mounting bracket to convert the rhythm circuit controls lefty. I've done that before on a Jazzmaster, so same difference. I might even be able to flip around the bone nut to lefty, it looks to be cut for that (and I'll probably put heavier strings on it than Squier did). Until I take them off, I can't tell whether I could just flip the metal control plates or will have to make/source replacements. Neither is daunting. I am fine with a righty tremolo on a lefty Fenderish offset, so no problem using this one.

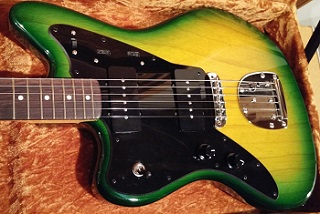
Being the big winter project, I'll have plenty of time to think about it, but the finish has taken a turn in my mind. I would have thought surf green most likely, but seeing the grain on the new body makes me question that. I think I would like to show that grain somewhat. Not like a burst, but maybe like a Mary Kaye. That's not a rattle can idea. I know it takes talent and consistent application, so I'm thinking of a long, slow, strongly diluted airbrush approach... something that takes many passes to really tint.

It's not a partscaster because it's not a Stratocaster or Telecaster. It's not a partsmaster because it's not a Jazzmaster, so what is it? A Jagermeister? I hope not. But I'm going to take my time with this, all ideas are welcome.
User avatar
BatUtilityBelt
Reactions:
Posts: 1574
Joined: Thu May 28, 2020 4:25 pm

Both arrived.
Both.jpg
So having received the righty Squier organ donor, I was finally able to check out a traditional Jaguar in person, which is just not the same experience as watching 30 YouTube videos. The Jaguar pickups are distinctly different from other types of single coils. They emphasize certain highs, and that interacts with other Jaguar parts to distinguish it well from other offsets. The bright electronics exaggerate those differences and you suddenly focus on those harmonics and low tension action nuances that end up standing out. This I can tell by playing a wrong-way strung instrument and it makes me anxious to get to work on the project. That's all great.
Damage.jpg
The not-so-great is this: The organ donor Squier that ProAudioStar sold me was supposed to be in mint condition, but it's not. The lower bout has a spot where it was badly bashed into something more solid than the guitar, smashing the finish and possibly deforming the wood underneath. Some might say "So what, you bought it for most of the other parts, and are replacing the body?". That's true, but I was hoping to recoupe some costs by selling off the mint body, and that part of the plan is ruined. Add to that my strong aversion at being sold something badly misrepresented, and it leaves me unhappy. I left a message for their customer support yesterday, but crickets so far. Is this a cautionary tale about ProAudioStar?
User avatar
honyock
Reactions:
Posts: 939
Joined: Wed May 27, 2020 2:27 pm

BatUtilityBelt wrote:Both arrived.
Both.jpg
So having received the righty Squier organ donor, I was finally able to check out a traditional Jaguar in person, which is just not the same experience as watching 30 YouTube videos. The Jaguar pickups are distinctly different from other types of single coils. They emphasize certain highs, and that interacts with other Jaguar parts to distinguish it well from other offsets. The bright electronics exaggerate those differences and you suddenly focus on those harmonics and low tension action nuances that end up standing out. This I can tell by playing a wrong-way strung instrument and it makes me anxious to get to work on the project. That's all great.
Damage.jpg
The not-so-great is this: The organ donor Squier that ProAudioStar sold me was supposed to be in mint condition, but it's not. The lower bout has a spot where it was badly bashed into something more solid than the guitar, smashing the finish and possibly deforming the wood underneath. Some might say "So what, you bought it for most of the other parts, and are replacing the body?". That's true, but I was hoping to recoupe some costs by selling off the mint body, and that part of the plan is ruined. Add to that my strong aversion at being sold something badly misrepresented, and it leaves me unhappy. I left a message for their customer support yesterday, but crickets so far. Is this a cautionary tale about ProAudioStar?
Their responsiveness on my purchase via their Reverb store was great. I paid a bit more than the price via their actual site, but I also got a mint CV JM for $300 give or take the price of a coffee.


Sent from my SM-G998U using Tapatalk

10 years, 2 months, and 8 days of blissful ignorance ruined by that snake in the grass Major Tom.
User avatar
BatUtilityBelt
Reactions:
Posts: 1574
Joined: Thu May 28, 2020 4:25 pm

So... After contacting them a couple days in a row about the problem and getting no response at all, I got frustrated and filed a BBB complaint (which they forward to the business). It may be a coincidence, but within an hour ProAudioStar responded to my very first contact (the email with the picture of the damage). They might just do the right thing, I'll follow up.
User avatar
Partscaster
Reactions:
Posts: 1543
Joined: Thu May 28, 2020 12:41 pm
Location: Mars: Sector 6

Pro Audio Star sent me a "mint" conga drum with a huge scratch. They refunded me about 15% once I called them. They were nice to deal with.
But, must have some glitch between files/sales, and actual inventory at warehouse.
"The man that hath no music in himself, nor is not moved with concord of sweet sounds, is fit for treasons, stratagems, and spoils. The motions of his spirit are dull as night, and his affections dark as Erebus. Let no such man be trusted."
User avatar
BatUtilityBelt
Reactions:
Posts: 1574
Joined: Thu May 28, 2020 4:25 pm

We negotiated a discount for the damage, and I'm happy with it now. They said the several day delay in responding was due to holiday busier than normal activity, which is certainly plausible. Knowing the guitar is staying, I can start determining which parts are transplanted and which are not. This is the fun phase for me.
User avatar
BatUtilityBelt
Reactions:
Posts: 1574
Joined: Thu May 28, 2020 4:25 pm

The new body and I walked the nervous path to the drill press to accommodate Franky's neck bolts. Luckily, that was uneventful and the Squier neck ended up bolting perfectly to the new body. Whew! I've had one go not very well and had to fill and redrill, and that's no joy but this one went great. I oiled the fret board and decided I like the laurel much more than I thought I would. It has a ton of character.
image.png
Opening up the cavities of the donor, I see the metal control plates are not reversible, both because their screw holes are countersunk on top, and they are not polish-worthy on the bottom. They will have to be replaced, which I was dreading. I've seen lefty sets for sale, but only at scalping prices. With the cavities open, I also realize the entire wiring harness will have to be desoldered and re-soldered into the new body because wires pass through tunnels between 4 different cavities in a Jaguar. It really is a tinker toy, just a very cool one. Since I'll have to rewire the entire thing though, I will bother to upgrade from the mini pots to full sized on the main controls, but might leave the rhythm circuit pots mini because of their odd mounting configuration.
User avatar
BatUtilityBelt
Reactions:
Posts: 1574
Joined: Thu May 28, 2020 4:25 pm

I tend to change my mind on project guitars, and the thought of having to desolder so much just bugged me. This morning I woke up with the realization many guitar makers cut the top so you could remove all the wiring and work on it separately if you want. Any well fitting plates will completely hide the gaps. This was easy enough to make happen, so I routed wire paths between the cavities. I'll be able to remove and reinstall all of the electronics without any resoldering now.
image.png
User avatar
mozz
Reactions:
Posts: 1035
Joined: Wed May 27, 2020 1:37 pm
Location: NE-PA.

I have to ask, why did you have to drill the neck holes? I see them in the body and the neck had to have holes because it was mounted. Other than that, i have never drilled a neck unless the bridge was mounted and measured, and have the low E and high E in place to check for evenness.
AGF refugee
User avatar
BatUtilityBelt
Reactions:
Posts: 1574
Joined: Thu May 28, 2020 4:25 pm

mozz wrote: Mon Nov 28, 2022 5:22 pm I have to ask, why did you have to drill the neck holes? I see them in the body and the neck had to have holes because it was mounted. Other than that, i have never drilled a neck unless the bridge was mounted and measured, and have the low E and high E in place to check for evenness.
Ah, yeah. The body had pilot holes for the neck that only ran about 1/4" deep. I was thinking they were through-holes when I bought the body, but no, they were just standard placement. So I drilled them through, and test-fit the neck with the holes somewhat tight. I can adjust them a bit, but string alignment with a bridge sitting in place did verify a good neck position with the holes where they are.
User avatar
BatUtilityBelt
Reactions:
Posts: 1574
Joined: Thu May 28, 2020 4:25 pm

Well finally. I got so tired of this Jaguar waiting on the bench while I tried to source parts from any trusted source. I finally snapped and ordered the lefty control plates from the one place I could find them - EYPPARTS, direct from China. I know they were suggested here once before and I even tried before to buy from them, but my credit card rejecting the transaction made me nervous about the company. I guess I can see why nobody makes lefty Jaguar knockoffs for the US market because parts are nearly impossible. Now I'll just wait the several months some people have mentioned ordering from them, but it will be great to get the Jaguar complete eventually. In the meantime, I've got some Deluxe teles to work on and a Liquid to give Jazzmaster pickups.
User avatar
BatUtilityBelt
Reactions:
Posts: 1574
Joined: Thu May 28, 2020 4:25 pm

That didn't take as long as I thought. Only waiting a couple of weeks, I received the (very hard to source) lefty control plates I ordered straight from EY Guitar in China. All the dimensions are perfect, and the finish is very good. They did well! I now finally trust EY Guitar for other parts orders. I won't be finishing it immediately, because I want to set up a proper paint booth for this project and practice on a few other pieces first (I expect to love this guitar when done). But I now have every part for this lefty Jaguar build, and I'm going to enjoy slowly making it a guitar!
Control plates from EY Guitar Small.jpg
User avatar
sabasgr68
Reactions:
Posts: 1348
Joined: Wed May 27, 2020 10:11 pm
Location: Venezuela, Caracas
Gearlist: Mossman Sunking Strat (model MN001) - Zoom G3xn - My hands
Contact:

I missed this post last year, but I´m glad I´m picking it up from this moment, now that you got your hard-to-get control plates.

Hoping it´ll be up and running before December!

:)
I´m the guy from Venezuela (Not Communist/Socialist) - Catholic - Husband - Father
Looking for online/remote job - Income on the internet
Always grateful to the AGF community and friends
AGF refugee - Banned by MOMO
User avatar
BatUtilityBelt
Reactions:
Posts: 1574
Joined: Thu May 28, 2020 4:25 pm

Still waiting on the lefty trem, but it's on its way, so I started thinking about drilling those holes and realized I should have the pickguard on when I align everything (to carefully position the trem). At that point I realized I haven't even thought about what I want to do for the pickguard. I looked online and no lefty Jag pickguard grabbed me for this guitar, so I'll be making one. I was thinking gold, but I'll be making it from a poplar sheet, and can do whatever I want. So suggestions are welcome.

This pic just has the donor righty's pickguard upside-down for visualizing... The body I want to achieve a transparent surf green showing some grain. What do you think I should do for the pick guard?
guard.jpg
User avatar
sabasgr68
Reactions:
Posts: 1348
Joined: Wed May 27, 2020 10:11 pm
Location: Venezuela, Caracas
Gearlist: Mossman Sunking Strat (model MN001) - Zoom G3xn - My hands
Contact:

BatUtilityBelt wrote: Wed Aug 16, 2023 6:27 pm Still waiting on the lefty trem, but it's on its way, so I started thinking about drilling those holes and realized I should have the pickguard on when I align everything (to carefully position the trem). At that point I realized I haven't even thought about what I want to do for the pickguard. I looked online and no lefty Jag pickguard grabbed me for this guitar, so I'll be making one. I was thinking gold, but I'll be making it from a poplar sheet, and can do whatever I want. So suggestions are welcome.

This pic just has the donor righty's pickguard upside-down for visualizing... The body I want to achieve a transparent surf green showing some grain. What do you think I should do for the pick guard?
guard.jpg
My first choice would be the "almost" obligatory white pearloid, but I know that´s too common. Other choice would be some purple - you´ll decide the degree of intensity -.

Tortoise also looks nice to me.

I know I´m stepping in the "secure" ground of colors. I tend to be on the conservative side of things ;)
I´m the guy from Venezuela (Not Communist/Socialist) - Catholic - Husband - Father
Looking for online/remote job - Income on the internet
Always grateful to the AGF community and friends
AGF refugee - Banned by MOMO
User avatar
BatUtilityBelt
Reactions:
Posts: 1574
Joined: Thu May 28, 2020 4:25 pm

sabasgr68 wrote: Thu Aug 17, 2023 11:20 am My first choice would be the "almost" obligatory white pearloid, but I know that´s too common. Other choice would be some purple - you´ll decide the degree of intensity -.

Tortoise also looks nice to me.

I know I´m stepping in the "secure" ground of colors. I tend to be in the conservative side of things ;)
I can see the purple. Surf green transparent with a purple guard works in this context. It's a Jaguar with traditional pickups and hardware, so the music I will likely play on it is about aliens and cryptids. That fits, being a bit wild.
User avatar
LightWingStudios
Site Admin
Reactions:
Posts: 1004
Joined: Wed May 27, 2020 11:34 am
Location: Titusville, FL U.S. of A.
Contact:

I'd call it a..."BatMaster". :)
U.S. Manufacturer Of Musical Instrument Protection Accessories: AxeShield HD, AxeSak HD, AmpShield HD, KeyShield HD, PedalShield HD, MixShield HD, AxeGlove And AxeCap.

Visit Us At https://www.LightWingStudios.com

Email us at contact@LightWingStudios.com
User avatar
sabasgr68
Reactions:
Posts: 1348
Joined: Wed May 27, 2020 10:11 pm
Location: Venezuela, Caracas
Gearlist: Mossman Sunking Strat (model MN001) - Zoom G3xn - My hands
Contact:

BatUtilityBelt wrote: Thu Aug 17, 2023 11:51 am
sabasgr68 wrote: Thu Aug 17, 2023 11:20 am My first choice would be the "almost" obligatory white pearloid, but I know that´s too common. Other choice would be some purple - you´ll decide the degree of intensity -.

Tortoise also looks nice to me.

I know I´m stepping in the "secure" ground of colors. I tend to be in the conservative side of things ;)
I can see the purple. Surf green transparent with a purple guard works in this context. It's a Jaguar with traditional pickups and hardware, so the music I will likely play on it is about aliens and cryptids. That fits, being a bit wild.
It´s a good option. Inspiration will come to you in the end :)

Green and purple, and aliens, you said?

Alien guitar.png
(Ok, it´s not a Jaguar guitar, but you get the idea :D )
I´m the guy from Venezuela (Not Communist/Socialist) - Catholic - Husband - Father
Looking for online/remote job - Income on the internet
Always grateful to the AGF community and friends
AGF refugee - Banned by MOMO
User avatar
BatUtilityBelt
Reactions:
Posts: 1574
Joined: Thu May 28, 2020 4:25 pm

Ok, a little progress, then a question...
Trem and plates and guard.jpg
Yesterday I made a pickguard template from the righty donor and cut 2 lefty guards (a little what-if insurance). Today, the trem arrived, so I'm ready to commit to exact locations for every screw hole. This being my first raw body offset trem build, I'm nervous about getting the trem in the exact right spot for proper action, etc. I'm sure I want to make sure both E strings are equidistant from the nut to the trem fulcrum, but I don't know anything about exactly where that is. I will run strings from the trem to tuners just to make sure the trem arm is not touching a string, and to ensure each string aligns well with the bridge and pickup poles. But does anyone know how to find the exact position the trem holes should go? There's a lot of wiggle room in that cavity. Thanks in advance.

Edit: Yes, I do see that they sent a righty arm with my lefty trem. I'm talking sternly with them about that, because I already had a righty trem I could have used from the donor guitar, and a righty arm on a lefty trem is almost functionally no different from a righty trem.
User avatar
glasshand
Reactions:
Posts: 706
Joined: Fri Jun 12, 2020 10:53 am

@BatUtilityBelt how do you cut pickguards? I took my first stab at it yesterday and struggled a bit. A jigsaw seemed like the best way, but I cracked the material doing it. The Dremel was slower but smoother.
User avatar
BatUtilityBelt
Reactions:
Posts: 1574
Joined: Thu May 28, 2020 4:25 pm

glasshand wrote: Sun Aug 20, 2023 10:06 am @BatUtilityBelt how do you cut pickguards? I took my first stab at it yesterday and struggled a bit. A jigsaw seemed like the best way, but I cracked the material doing it. The Dremel was slower but smoother.
My typical process is slow and unprofessional, but I get through it. I'll describe this one best I can.

In this case I was copying a righty Classic Vibe pickguard shape to make a reverse of it.

Making my template:
1. I used double-sided tape to stick the CV pickguard to a piece of half inch MDF.
2. With a drill press, I drilled 1/8" holes through the mounting screw locations.
3. I used the drill press to drill 1/2" pilot holes for later inside cuts like pickup and bridge post holes.
4. I outlined the entire pickguard shape onto the MDF with a pen.
5. I removed the pickguard from the MDF, and used a scroll saw to follow those lines cutting out the shape. I like to leave less than 1/8 inch extra material.
6. Pinning the 1/8" mounting screw locations as guides, I double-sided tape the pick guard back onto the MDF template with the wide side (bottom) facing out.
7. I used my cheap router table to follow the shape of the donor pick guard and clean up all the MDF template edges including inside holes.
8. I remove the pick guard from the template and hand sand the edges of the MDF template.
Pickguard template.jpg
Making my pickguard:
1. I use double-sided tape to stick the pickguard material to the MDF template.
2. I drilled 1/8" holes through the mounting screw locations.
3. I drilled a 1/2" pilot hole through each inner cut (pickups, bridge posts).
4. I traced the entire template shape onto the pickguard material.
5. I removed the MDF template from the pickguard material and used the scroll saw to follow all lines.
6. I taped the pickguard material back onto the MDF template.
7. I used the router table to remove excess pickguard material using the template as a guiding edge.
7.1 If putting a bevel on the edge, I would make sure the pickguard is facing out, and use the router to apply that bevel cut.
8. I removed the new pickguard from the template and hand sanded the edges.
Poplar Guard.jpg
Edit: I just noticed the pickguard picture was taken before one more step:
9. I used wood glue and sanding dust to fill tear-outs made by the drill press because I drilled the mounting screw holes from the wrong side and had too much tear-out. In this case it's ok to fill like that because the guard will be painted.
User avatar
glasshand
Reactions:
Posts: 706
Joined: Fri Jun 12, 2020 10:53 am

@BatUtilityBelt that's quite a detailed writeup, thanks! I'm also copying a pickguard, but I don't have much of a workshop setup here. I was thinking I'd do
1. Dremel out the rough outline of the pickguard
2. Clean up & bevel the edges (combination of files, sandpaper, and Dremel as needed)

plus drill press for screw holes and starter holes for pickup routs.
User avatar
BatUtilityBelt
Reactions:
Posts: 1574
Joined: Thu May 28, 2020 4:25 pm

glasshand wrote: Sun Aug 20, 2023 12:43 pm @BatUtilityBelt that's quite a detailed writeup, thanks! I'm also copying a pickguard, but I don't have much of a workshop setup here. I was thinking I'd do
1. Dremel out the rough outline of the pickguard
2. Clean up & bevel the edges (combination of files, sandpaper, and Dremel as needed)

plus drill press for screw holes and starter holes for pickup routs.
I made a tele pickguard exactly that way and it turned out pretty well. Just took longer.
User avatar
BatUtilityBelt
Reactions:
Posts: 1574
Joined: Thu May 28, 2020 4:25 pm

While carefully nudging and trimming things to fit all together nicely before I start drilling mounting holes...

The tremolo vendor informs me he can't source a lefty arm to go on the lefty trem, so he suggested a return instead of a bad review. Two steps forward, one step back. I asked if he would pay for shipping both ways, and he asked if he could discount the trem instead to cover me finding a replacement arm. Several more back-and-forth messages, and he will refund $12. I measured the arm, and I can easily get a lefty arm to replace it for that, so I will go ahead and mount this trem. [Edited after the refund offer]
Just cannot find a lefty arm.jpg
User avatar
BatUtilityBelt
Reactions:
Posts: 1574
Joined: Thu May 28, 2020 4:25 pm

A little update... I got a Wilkinson trem arm that fits it perfectly, and decided to take the plunge to drill every hole. Of course the scary part was mounting the trem just right. I came to realize the gaps between the trem and the cavity as routed only gave me about 3/16" play in one direction and about 3/32" play in the other direction. So I taped a shim spacer inside the cavity to tell me where I was on one axis, and found a good placement for the other axis. There are no wrong holes hiding under the hardware, every one worked well. And because I had to put a few strings on just to align the trem for mounting without interference, I decided to put on a whole set. Why put it together this far without actually playing it, right? Yes, I tuned it and tested (played) about an hour. I didn't ground all the grounding points, so there was some 60 cycle hum, but this little Jag sounds great and works just as expected. It was really fun trying it out, and I love its tone. That made my day!
Everything Mounted.jpg
After this, everything comes back off and I will work on finishing the body and pg. I will experiment on other pieces with the transparent finish I'm going after, so it will be maybe a month or more before this guitar gets finished. But it's on a great path now.
Post Reply