Did you shave the headstock into a blade?
Whats on your work bench?
-
dearlpitts
- Reactions:
- Posts: 195
- Joined: Thu Jun 25, 2020 2:21 am
- Gearlist: Strat,steat,strat,agile3018,tele ,mustang
Lots of groovy stuff going on in here

This is a body that somebody tried to strip the paint off with a heat gun. Problem is that it is a laminated body and the heat started to delaminate the wood. I removed all the loose wood and used automotive body filler to build it back up. I just got paint on it today and I think it turned out real good!
-
Rollin Hand

- Reactions:
- Posts: 1444
- Joined: Wed May 27, 2020 1:38 pm
I don't think it is smart to do the black stripes untill I know what I am going to do with the rough surface.
The paint is Duplicolour automotive lacquer.
"I'm not a sore loser. It's just that I prefer to win, and when I don't, I get furious."
- Ron Swanson
- Ron Swanson
Depending on how rough it is, it might be better to just go ahead and do all the colors, then a thick coat of clear. Use the clear coat to smooth everything out.Rollin Hand wrote: ↑Fri Jul 10, 2020 10:37 am 20200710_103058.jpg
20200710_103117.jpg
Ok, red paint is on, and....well, it's really pebbly. It feels like a rough surface,not smooth. So the question is,wait a month until it fully cures, wetsand, then and then set up to do the black stripes? Rubbing compound then the black stripes?
I don't think it is smart to do the black stripes untill I know what I am going to do with the rough surface.
The paint is Duplicolour automotive lacquer.
Whooaaaaa nelly!dbrian66 wrote: ↑Fri Jul 10, 2020 7:03 pmDepending on how rough it is, it might be better to just go ahead and do all the colors, then a thick coat of clear. Use the clear coat to smooth everything out.Rollin Hand wrote: ↑Fri Jul 10, 2020 10:37 am 20200710_103058.jpg
20200710_103117.jpg
Ok, red paint is on, and....well, it's really pebbly. It feels like a rough surface,not smooth. So the question is,wait a month until it fully cures, wetsand, then and then set up to do the black stripes? Rubbing compound then the black stripes?
I don't think it is smart to do the black stripes untill I know what I am going to do with the rough surface.
The paint is Duplicolour automotive lacquer.
Ed's actually /does/ have a finish, it's just ultra thin and flat. Absolutely no gloss shine.
-
Rollin Hand
- Reactions:
- Posts: 1444
- Joined: Wed May 27, 2020 1:38 pm
I had pondered clearing, but decided the grain filling was not done well enough to justfy it. Also, as Cid said, it is a 5150. It would feel wrong to have a thick coat of clear.dbrian66 wrote: ↑Fri Jul 10, 2020 7:03 pmDepending on how rough it is, it might be better to just go ahead and do all the colors, then a thick coat of clear. Use the clear coat to smooth everything out.Rollin Hand wrote: ↑Fri Jul 10, 2020 10:37 am 20200710_103058.jpg
20200710_103117.jpg
Ok, red paint is on, and....well, it's really pebbly. It feels like a rough surface,not smooth. So the question is,wait a month until it fully cures, wetsand, then and then set up to do the black stripes? Rubbing compound then the black stripes?
I don't think it is smart to do the black stripes untill I know what I am going to do with the rough surface.
The paint is Duplicolour automotive lacquer.
I have enough paint on there that I should be good to go with some wet sanding and polishing. I have done this on cars and made them shine like a mirror. In this case, I am not even trying for an amazing shine.
"I'm not a sore loser. It's just that I prefer to win, and when I don't, I get furious."
- Ron Swanson
- Ron Swanson
My bad! LOL. I’m not really into making replicas, so I don’t know all the details like that. I was just trying to help find a way to smooth it out!PsychoCid wrote: ↑Fri Jul 10, 2020 7:58 pmWhooaaaaa nelly!dbrian66 wrote: ↑Fri Jul 10, 2020 7:03 pmDepending on how rough it is, it might be better to just go ahead and do all the colors, then a thick coat of clear. Use the clear coat to smooth everything out.Rollin Hand wrote: ↑Fri Jul 10, 2020 10:37 am 20200710_103058.jpg
20200710_103117.jpg
Ok, red paint is on, and....well, it's really pebbly. It feels like a rough surface,not smooth. So the question is,wait a month until it fully cures, wetsand, then and then set up to do the black stripes? Rubbing compound then the black stripes?
I don't think it is smart to do the black stripes untill I know what I am going to do with the rough surface.
The paint is Duplicolour automotive lacquer.This is a 5150. Not having a thick finish may be the most important aspect of the guitar, at minimum in the top 2 after the neck carve.
Ed's actually /does/ have a finish, it's just ultra thin and flat. Absolutely no gloss shine.
-
Rollin Hand
- Reactions:
- Posts: 1444
- Joined: Wed May 27, 2020 1:38 pm
I found a thread on TDPRI where a guy ran into the exact same issue. He wetsanded and cleared, then wetsanded and polished the clear. I think that I will just wetsand and polish it juuuust enough.....
No clear though.
Dammit, I just wanted this done.
No clear though.
Dammit, I just wanted this done.
"I'm not a sore loser. It's just that I prefer to win, and when I don't, I get furious."
- Ron Swanson
- Ron Swanson

Second of the Fender princeton build series, which one was to be stock and the second was hot rodded. I am still waiting on the princeton chassis (from Banzai w germany) so i put together the hot rodded one first. Cabinet and chassis (tweed style) was from my free haul last year. Eyelet board from Hoffman (el34.com).
Previous owner/builder had drilled the holes to mount the tweed chassis like a blackface mount, 4 holes and chassis straps. You can't mount a tweed chassis like that as the heat could not get out and/or too many mods to make it work. I mounted it like a regular tweed, but you can see the extra holes. Faceplate was drilled and not in a perfect line, but you wouldn't have noticed unless i said so, hopefully.
No, i did not plug a guitar in yet. Waiting for the wife to be either, non sleeping for work, shopping, etc.
Stock setup EXCEPT: (or no longer a princeton because i ...)
larger power transformer, (unknown, i stripped it from something) getting 435 volts on the plates of old 6v6 rca's from 1952, 22 ma.
larger output transformer, 8 ohms only.
larger reverb single ended champ style transformer, hope the impedance is ok.
added a choke, because i had one, and it should smooth out the screen current and preamp.
40uf first capacitor, then 20,20,20.
5v4 rectifier, better than a 5y3 yet a 5ar4 would put me closer to 450 or more volts and that's getting real close to smoke.
adjustable bias.
phase splitter voltage tap moved to "C" node, alas know as "Stokes mod", more swing.
tried 6l6's and the plate voltage only dropped to 420v from 435v, so pretty sure the power transformer can handle them no sweat.
470 ohm screen resistors because fender was too cheap to use them.
shielded wire where needed, teflon wire for everything else.
Mid pot which will bring back that which is scooped, or all the way up for tone stack disconnect. Should be a nice grind/boost.
Negative feedback pot, from stock to dirty.
Jensen 1970 C12N reconed. Big ass magnet, had to put the tansformers in certain places due to the size of this magnet.
Weight 34 lbs. I think it's the heaviest build i have done in this size cabinet, and i have about 8 of them.
Pics or it didn't happen , sound clips or it doesn't work. No sounds yet. But i swear it works.
AGF refugee

Decided to throw this together. The body was a test for a certain kind of paint. The paint is terrible, I'll never use it again. I found out it doesn't work for my needs, so does that make it a successful test or a failure?
Working on another batch of bodies...
...and waiting for the primer to dry on the arcade cabinet so I can sand it down and get it ready for paint.
"What is this place? Where am I?"
-
Rollin Hand
- Reactions:
- Posts: 1444
- Joined: Wed May 27, 2020 1:38 pm
What don't you like about the paint? Because it looks badass.rrobbone wrote: ↑Tue Jul 14, 2020 1:34 am Decided to throw this together. The body was a test for a certain kind of paint. The paint is terrible, I'll never use it again. I found out it doesn't work for my needs, so does that make it a successful test or a failure?
IMG_2682.jpg
Working on another batch of bodies...
IMG_2686.jpg
...and waiting for the primer to dry on the arcade cabinet so I can sand it down and get it ready for paint.
"I'm not a sore loser. It's just that I prefer to win, and when I don't, I get furious."
- Ron Swanson
- Ron Swanson
Thanks for the compliment!Rollin Hand wrote: ↑Tue Jul 14, 2020 2:56 pmWhat don't you like about the paint? Because it looks badass.rrobbone wrote: ↑Tue Jul 14, 2020 1:34 am Decided to throw this together. The body was a test for a certain kind of paint. The paint is terrible, I'll never use it again. I found out it doesn't work for my needs, so does that make it a successful test or a failure?
IMG_2682.jpg
Working on another batch of bodies...
IMG_2686.jpg
...and waiting for the primer to dry on the arcade cabinet so I can sand it down and get it ready for paint.
The base color is fine, same stuff I always use for color. It holds up, is easy to apply, and is colorfast. No issues, I love the stuff.
The interior logo, again fine. I wanted to see how granular I could go for small detail with acrylic pens. I did the Super Bee logo (the bee, and the "Super Bee" lettering) with the pens on front and back, the backside logo looks much better. The pens will work, but I've devised a better plan for super fine detail.
The above methods are holding up under the stress I've placed the body under. It's been hanging in my non-climate-controlled shop for almost two years. That's prolonged 90+ degree exposure in summertime, and even longer freezing temperatures during winter. Plus, there were a couple scratch and ding tests done, because I've had questions posed.
The stripes, however, were painted via brush in a medium I hadn't used before. They are now uneven, patchy, and cracked. They are wearing off and taking the clearcoat with it. I did this in Feb of '18, so it's not very old. It looks like shit, but not in that cool, relic'd way. It's not a good look, and I wouldn't feel comfortable selling a body like this for what I'd want to get out of it considering the time and work involved. I took it on as a loss when I started it.
Which presents a problem: I could sell it for full price immediately. I've posted it on IG a few times - stating that it's a test bed, it's cracking and peeling, it's not my best work, etc. - But I still get offers for it, and at price I'd consider selling it for if it were what I'd call sellable condition - including the time and effort spent considered. But, like a moron, I went and decided to have a conscience (thanks, dad). I just don't feel good letting it out of the shop - so I built it out from spare parts instead.
Someone again offered me stupid money for it, this time for the whole guitar. I'm going to offer him a commissioned work instead, so I can do it right. For the money he offered, it's only fair. We'll see if he accepts the terms, which is a whole other thing.
"What is this place? Where am I?"
I’m trying a new finish process that I have never done before. White washing. I bought this pine Tele body off of eBay. Sanded it all down and stained it with an ebony stain. Sanded that back down and tried the white wash. It’s not as white as I want, but is looking pretty cool. Might need to mix the paint a little stronger. It’s a pretty simple process. I made a quick video of doing the first coat. Here are some pics and a link to the video.
https://youtu.be/dWwnSi10iRk

Got a new P/J pickup set from Epic Custom Shop, which get excellent reviews and are a very close visual match for the pickups that originally came with my Fender Jazz Bass Special (which disappeared somewhere along this guitar's 35-year history). I go to put them in last night, and the P pickup is too big for the rout. That doesn't completely surprise me; P pickups are less standardized than one would like, and I had to sand down the covers on the last one I used. But this one is HUGE, like the ears stick about about 2.5mm farther than on the last one. Worse than that, the J pickup doesn't quite fit either, which was not a problem with the last set.
Damn Japan and their precision manufacturing; if they'd only made the routs looser and sloppier, none of this would be a problem.
Damn Japan and their precision manufacturing; if they'd only made the routs looser and sloppier, none of this would be a problem.
-
mkgearhead

- Reactions:
- Posts: 103
- Joined: Thu May 28, 2020 8:46 pm
I brought this Squier Standard Strat home Saturday night. It got a little makeover Sunday morning.
Nice! I had a Standard for a while and really liked it, and I always felt the Standard was an under-represented guitar. One thing you may want to check for, if you haven't already, is that the bridge posts are not loose or leaning forward. The wood is a bit soft and the posts are really close to the pickup rout, and in one of your pictures (the one with the pickguard off and flipped over) it looks like the treble-side post may be a little loose, although it could just be a shadow.mkgearhead wrote: ↑Wed Jul 22, 2020 9:40 am I brought this Squier Standard Strat home Saturday night.
I had the same issue not too long ago. I don't know if maybe the paint was bad, or I just didn't agitate it enough, maybe I didn't clean the wood enough, maybe there was something in the wood - I still don't know wat happened. But I can tell you now that having this issue on six bodies at once has made me research and be super meticulous about how I prep my spray bombs these days.Rollin Hand wrote: ↑Sat Jul 11, 2020 10:27 am I found a thread on TDPRI where a guy ran into the exact same issue. He wetsanded and cleared, then wetsanded and polished the clear. I think that I will just wetsand and polish it juuuust enough.....
No clear though.
Dammit, I just wanted this done.
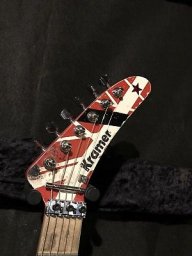
Let it flash completely, as far as it will go. At least a few days, possibly a week. It will likely be a bit gummy. If it's loose enough, try to brush off as much as possible with a clean rag or towel. Then sand it down. This is going to load up a lot of sandpaper - wet sanding or no. Luckily, the finish on Frankie is really thin looking - translucent in spots. It's going to be tough not to drag that red across the white.
Stripping it and starting over would be recommended if you want accuracy in the reproduction. It's a very specific look that guitar has.
I want to build one for myself, but I'm looking for just the right hunk of wood to do so.
"What is this place? Where am I?"
-
Rollin Hand
- Reactions:
- Posts: 1444
- Joined: Wed May 27, 2020 1:38 pm
It has already flashed for a week and a half, and feels like sandpaper. It is not loose at all.rrobbone wrote: ↑Wed Jul 22, 2020 4:14 pmI had the same issue not too long ago. I don't know if maybe the paint was bad, or I just didn't agitate it enough, maybe I didn't clean the wood enough, maybe there was something in the wood - I still don't know wat happened. But I can tell you now that having this issue on six bodies at once has made me research and be super meticulous about how I prep my spray bombs these days.Rollin Hand wrote: ↑Sat Jul 11, 2020 10:27 am I found a thread on TDPRI where a guy ran into the exact same issue. He wetsanded and cleared, then wetsanded and polished the clear. I think that I will just wetsand and polish it juuuust enough.....
No clear though.
Dammit, I just wanted this done.
Let it flash completely, as far as it will go. At least a few days, possibly a week. It will likely be a bit gummy. If it's loose enough, try to brush off as much as possible with a clean rag or towel. Then sand it down. This is going to load up a lot of sandpaper - wet sanding or no. Luckily, the finish on Frankie is really thin looking - translucent in spots. It's going to be tough not to drag that red across the white.
Stripping it and starting over would be recommended if you want accuracy in the reproduction. It's a very specific look that guitar has.
I want to build one for myself, but I'm looking for just the right hunk of wood to do so.
I am hoping that I will get to sand this weekend. I couldn't last weekend due to fresh stitches and dust being a bad combo. I was going to go with wetsanding, but I gather that it can create issues with and exposed wood, and the neck joint is bare.
The white paint has been curing for 10 months, so I am less worried about that. Any colouring feom the sanding.should come out with rubbing compound once the sanding is done.
And I am never spraying on such a hot day again.
"I'm not a sore loser. It's just that I prefer to win, and when I don't, I get furious."
- Ron Swanson
- Ron Swanson
-
Don Tonberry
- Reactions:
- Posts: 14
- Joined: Wed May 27, 2020 7:12 pm
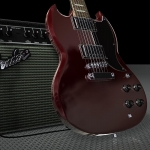
Been working on this the past 2 days. Had dual humbuckers before but I got some adapter rings and made it regular ol Tele setup. Still needs a full setup but it seems to twang despite the nontraditional components

-
mkgearhead
- Reactions:
- Posts: 103
- Joined: Thu May 28, 2020 8:46 pm
The bridge posts are straight and solid on this one. I've had a few and never had that issue on any of them.glasshand wrote: ↑Wed Jul 22, 2020 11:38 amNice! I had a Standard for a while and really liked it, and I always felt the Standard was an under-represented guitar. One thing you may want to check for, if you haven't already, is that the bridge posts are not loose or leaning forward. The wood is a bit soft and the posts are really close to the pickup rout, and in one of your pictures (the one with the pickguard off and flipped over) it looks like the treble-side post may be a little loose, although it could just be a shadow.mkgearhead wrote: ↑Wed Jul 22, 2020 9:40 am I brought this Squier Standard Strat home Saturday night.
Stock Fender princeton reverb build in the 76' silverface cabinet. Cabinet by Fender, chassis by Zack Hunter (ebay, reverb). He makes nice plain chassis for one of the best prices you can find.
Enough for one day, time for a beer. Yes,i put felts behind the knobs, why, i don't know, definitely makes them harder to turn.
Most chassis wiring done except the board and input jacks, and make a small adjustable bias board.
Enough for one day, time for a beer. Yes,i put felts behind the knobs, why, i don't know, definitely makes them harder to turn.
Most chassis wiring done except the board and input jacks, and make a small adjustable bias board.
AGF refugee
I finally got around to reattaching the jack on my Ovation. I was pretty sure that the only thing wrong with the electronics was that one of the wires to the jack was broken, and I was glad to see I was right, and it was nothing more than five minutes' soldering to fix it!
Then I went to put a replacement nut on the jack (since the old one got lost when a previous owner monkeyed with it)...and apparently the jacks that Ovation uses are not the same size that pretty much every other guitar maker on the planet uses. *sigh*
Then I went to put a replacement nut on the jack (since the old one got lost when a previous owner monkeyed with it)...and apparently the jacks that Ovation uses are not the same size that pretty much every other guitar maker on the planet uses. *sigh*

I actually did these almost exactly a year ago. I ran across these pics looking for something else so I though I would share. Studio monitor stands. They swivel (if your spraypaint isn't too tacky). I ordered some rubber feet for the base of the stands and the bottom of the speakers.
To give anything less than your best, is to sacrifice the gift
Steve Prefontaine
Steve Prefontaine